Data presentation: A comprehensive guide
Learn how to create data presentation effectively and communicate your insights in a way that is clear, concise, and engaging.
Raja Bothra
Building presentations


Table of contents
Hey there, fellow data enthusiast!
Welcome to our comprehensive guide on data presentation.
Whether you're an experienced presenter or just starting, this guide will help you present your data like a pro. We'll dive deep into what data presentation is, why it's crucial, and how to master it. So, let's embark on this data-driven journey together.
What is data presentation?
Data presentation is the art of transforming raw data into a visual format that's easy to understand and interpret. It's like turning numbers and statistics into a captivating story that your audience can quickly grasp. When done right, data presentation can be a game-changer, enabling you to convey complex information effectively.
Why are data presentations important?
Imagine drowning in a sea of numbers and figures. That's how your audience might feel without proper data presentation. Here's why it's essential:
- Clarity : Data presentations make complex information clear and concise.
- Engagement : Visuals, such as charts and graphs, grab your audience's attention.
- Comprehension : Visual data is easier to understand than long, numerical reports.
- Decision-making : Well-presented data aids informed decision-making.
- Impact : It leaves a lasting impression on your audience.
Types of data presentation:
Now, let's delve into the diverse array of data presentation methods, each with its own unique strengths and applications. We have three primary types of data presentation, and within these categories, numerous specific visualization techniques can be employed to effectively convey your data.
1. Textual presentation
Textual presentation harnesses the power of words and sentences to elucidate and contextualize your data. This method is commonly used to provide a narrative framework for the data, offering explanations, insights, and the broader implications of your findings. It serves as a foundation for a deeper understanding of the data's significance.
2. Tabular presentation
Tabular presentation employs tables to arrange and structure your data systematically. These tables are invaluable for comparing various data groups or illustrating how data evolves over time. They present information in a neat and organized format, facilitating straightforward comparisons and reference points.
3. Graphical presentation
Graphical presentation harnesses the visual impact of charts and graphs to breathe life into your data. Charts and graphs are powerful tools for spotlighting trends, patterns, and relationships hidden within the data. Let's explore some common graphical presentation methods:
- Bar charts: They are ideal for comparing different categories of data. In this method, each category is represented by a distinct bar, and the height of the bar corresponds to the value it represents. Bar charts provide a clear and intuitive way to discern differences between categories.
- Pie charts: It excel at illustrating the relative proportions of different data categories. Each category is depicted as a slice of the pie, with the size of each slice corresponding to the percentage of the total value it represents. Pie charts are particularly effective for showcasing the distribution of data.
- Line graphs: They are the go-to choice when showcasing how data evolves over time. Each point on the line represents a specific value at a particular time period. This method enables viewers to track trends and fluctuations effortlessly, making it perfect for visualizing data with temporal dimensions.
- Scatter plots: They are the tool of choice when exploring the relationship between two variables. In this method, each point on the plot represents a pair of values for the two variables in question. Scatter plots help identify correlations, outliers, and patterns within data pairs.
The selection of the most suitable data presentation method hinges on the specific dataset and the presentation's objectives. For instance, when comparing sales figures of different products, a bar chart shines in its simplicity and clarity. On the other hand, if your aim is to display how a product's sales have changed over time, a line graph provides the ideal visual narrative.
Additionally, it's crucial to factor in your audience's level of familiarity with data presentations. For a technical audience, more intricate visualization methods may be appropriate. However, when presenting to a general audience, opting for straightforward and easily understandable visuals is often the wisest choice.
In the world of data presentation, choosing the right method is akin to selecting the perfect brush for a masterpiece. Each tool has its place, and understanding when and how to use them is key to crafting compelling and insightful presentations. So, consider your data carefully, align your purpose, and paint a vivid picture that resonates with your audience.
What to include in data presentation?
When creating your data presentation, remember these key components:
- Data points : Clearly state the data points you're presenting.
- Comparison : Highlight comparisons and trends in your data.
- Graphical methods : Choose the right chart or graph for your data.
- Infographics : Use visuals like infographics to make information more digestible.
- Numerical values : Include numerical values to support your visuals.
- Qualitative information : Explain the significance of the data.
- Source citation : Always cite your data sources.
How to structure an effective data presentation?
Creating a well-structured data presentation is not just important; it's the backbone of a successful presentation. Here's a step-by-step guide to help you craft a compelling and organized presentation that captivates your audience:
1. Know your audience
Understanding your audience is paramount. Consider their needs, interests, and existing knowledge about your topic. Tailor your presentation to their level of understanding, ensuring that it resonates with them on a personal level. Relevance is the key.
2. Have a clear message
Every effective data presentation should convey a clear and concise message. Determine what you want your audience to learn or take away from your presentation, and make sure your message is the guiding light throughout your presentation. Ensure that all your data points align with and support this central message.
3. Tell a compelling story
Human beings are naturally wired to remember stories. Incorporate storytelling techniques into your presentation to make your data more relatable and memorable. Your data can be the backbone of a captivating narrative, whether it's about a trend, a problem, or a solution. Take your audience on a journey through your data.
4. Leverage visuals
Visuals are a powerful tool in data presentation. They make complex information accessible and engaging. Utilize charts, graphs, and images to illustrate your points and enhance the visual appeal of your presentation. Visuals should not just be an accessory; they should be an integral part of your storytelling.
5. Be clear and concise
Avoid jargon or technical language that your audience may not comprehend. Use plain language and explain your data points clearly. Remember, clarity is king. Each piece of information should be easy for your audience to digest.
6. Practice your delivery
Practice makes perfect. Rehearse your presentation multiple times before the actual delivery. This will help you deliver it smoothly and confidently, reducing the chances of stumbling over your words or losing track of your message.
A basic structure for an effective data presentation
Armed with a comprehensive comprehension of how to construct a compelling data presentation, you can now utilize this fundamental template for guidance:
In the introduction, initiate your presentation by introducing both yourself and the topic at hand. Clearly articulate your main message or the fundamental concept you intend to communicate.
Moving on to the body of your presentation, organize your data in a coherent and easily understandable sequence. Employ visuals generously to elucidate your points and weave a narrative that enhances the overall story. Ensure that the arrangement of your data aligns with and reinforces your central message.
As you approach the conclusion, succinctly recapitulate your key points and emphasize your core message once more. Conclude by leaving your audience with a distinct and memorable takeaway, ensuring that your presentation has a lasting impact.
Additional tips for enhancing your data presentation
To take your data presentation to the next level, consider these additional tips:
- Consistent design : Maintain a uniform design throughout your presentation. This not only enhances visual appeal but also aids in seamless comprehension.
- High-quality visuals : Ensure that your visuals are of high quality, easy to read, and directly relevant to your topic.
- Concise text : Avoid overwhelming your slides with excessive text. Focus on the most critical points, using visuals to support and elaborate.
- Anticipate questions : Think ahead about the questions your audience might pose. Be prepared with well-thought-out answers to foster productive discussions.
By following these guidelines, you can structure an effective data presentation that not only informs but also engages and inspires your audience. Remember, a well-structured presentation is the bridge that connects your data to your audience's understanding and appreciation.
Do’s and don'ts on a data presentation
- Use visuals : Incorporate charts and graphs to enhance understanding.
- Keep it simple : Avoid clutter and complexity.
- Highlight key points : Emphasize crucial data.
- Engage the audience : Encourage questions and discussions.
- Practice : Rehearse your presentation.
Don'ts:
- Overload with data : Less is often more; don't overwhelm your audience.
- Fit Unrelated data : Stay on topic; don't include irrelevant information.
- Neglect the audience : Ensure your presentation suits your audience's level of expertise.
- Read word-for-word : Avoid reading directly from slides.
- Lose focus : Stick to your presentation's purpose.
Summarizing key takeaways
- Definition : Data presentation is the art of visualizing complex data for better understanding.
- Importance : Data presentations enhance clarity, engage the audience, aid decision-making, and leave a lasting impact.
- Types : Textual, Tabular, and Graphical presentations offer various ways to present data.
- Choosing methods : Select the right method based on data, audience, and purpose.
- Components : Include data points, comparisons, visuals, infographics, numerical values, and source citations.
- Structure : Know your audience, have a clear message, tell a compelling story, use visuals, be concise, and practice.
- Do's and don'ts : Do use visuals, keep it simple, highlight key points, engage the audience, and practice. Don't overload with data, include unrelated information, neglect the audience's expertise, read word-for-word, or lose focus.
FAQ's on a data presentation
1. what is data presentation, and why is it important in 2024.
Data presentation is the process of visually representing data sets to convey information effectively to an audience. In an era where the amount of data generated is vast, visually presenting data using methods such as diagrams, graphs, and charts has become crucial. By simplifying complex data sets, presentation of the data may helps your audience quickly grasp much information without drowning in a sea of chart's, analytics, facts and figures.
2. What are some common methods of data presentation?
There are various methods of data presentation, including graphs and charts, histograms, and cumulative frequency polygons. Each method has its strengths and is often used depending on the type of data you're using and the message you want to convey. For instance, if you want to show data over time, try using a line graph. If you're presenting geographical data, consider to use a heat map.
3. How can I ensure that my data presentation is clear and readable?
To ensure that your data presentation is clear and readable, pay attention to the design and labeling of your charts. Don't forget to label the axes appropriately, as they are critical for understanding the values they represent. Don't fit all the information in one slide or in a single paragraph. Presentation software like Prezent and PowerPoint can help you simplify your vertical axis, charts and tables, making them much easier to understand.
4. What are some common mistakes presenters make when presenting data?
One common mistake is trying to fit too much data into a single chart, which can distort the information and confuse the audience. Another mistake is not considering the needs of the audience. Remember that your audience won't have the same level of familiarity with the data as you do, so it's essential to present the data effectively and respond to questions during a Q&A session.
5. How can I use data visualization to present important data effectively on platforms like LinkedIn?
When presenting data on platforms like LinkedIn, consider using eye-catching visuals like bar graphs or charts. Use concise captions and e.g., examples to highlight the single most important information in your data report. Visuals, such as graphs and tables, can help you stand out in the sea of textual content, making your data presentation more engaging and shareable among your LinkedIn connections.
Create your data presentation with prezent
Prezent can be a valuable tool for creating data presentations. Here's how Prezent can help you in this regard:
- Time savings : Prezent saves up to 70% of presentation creation time, allowing you to focus on data analysis and insights.
- On-brand consistency : Ensure 100% brand alignment with Prezent's brand-approved designs for professional-looking data presentations.
- Effortless collaboration : Real-time sharing and collaboration features make it easy for teams to work together on data presentations.
- Data storytelling : Choose from 50+ storylines to effectively communicate data insights and engage your audience.
- Personalization : Create tailored data presentations that resonate with your audience's preferences, enhancing the impact of your data.
In summary, Prezent streamlines the process of creating data presentations by offering time-saving features, ensuring brand consistency, promoting collaboration, and providing tools for effective data storytelling. Whether you need to present data to clients, stakeholders, or within your organization, Prezent can significantly enhance your presentation-making process.
So, go ahead, present your data with confidence, and watch your audience be wowed by your expertise.
Thank you for joining us on this data-driven journey. Stay tuned for more insights, and remember, data presentation is your ticket to making numbers come alive! Sign up for our free trial or book a demo !
More zenpedia articles

Employee training and development presentation guide

Clinical trial investment decision: A presentation guide

How to start a resentation: 8 Powerful Approaches
Get the latest from Prezent community
Join thousands of subscribers who receive our best practices on communication, storytelling, presentation design, and more. New tips weekly. (No spam, we promise!)
- SUGGESTED TOPICS
- The Magazine
- Newsletters
- Managing Yourself
- Managing Teams
- Work-life Balance
- The Big Idea
- Data & Visuals
- Case Selections
- HBR Learning
- Topic Feeds
- Account Settings
- Email Preferences
Present Your Data Like a Pro
- Joel Schwartzberg

Demystify the numbers. Your audience will thank you.
While a good presentation has data, data alone doesn’t guarantee a good presentation. It’s all about how that data is presented. The quickest way to confuse your audience is by sharing too many details at once. The only data points you should share are those that significantly support your point — and ideally, one point per chart. To avoid the debacle of sheepishly translating hard-to-see numbers and labels, rehearse your presentation with colleagues sitting as far away as the actual audience would. While you’ve been working with the same chart for weeks or months, your audience will be exposed to it for mere seconds. Give them the best chance of comprehending your data by using simple, clear, and complete language to identify X and Y axes, pie pieces, bars, and other diagrammatic elements. Try to avoid abbreviations that aren’t obvious, and don’t assume labeled components on one slide will be remembered on subsequent slides. Every valuable chart or pie graph has an “Aha!” zone — a number or range of data that reveals something crucial to your point. Make sure you visually highlight the “Aha!” zone, reinforcing the moment by explaining it to your audience.
With so many ways to spin and distort information these days, a presentation needs to do more than simply share great ideas — it needs to support those ideas with credible data. That’s true whether you’re an executive pitching new business clients, a vendor selling her services, or a CEO making a case for change.
- JS Joel Schwartzberg oversees executive communications for a major national nonprofit, is a professional presentation coach, and is the author of Get to the Point! Sharpen Your Message and Make Your Words Matter and The Language of Leadership: How to Engage and Inspire Your Team . You can find him on LinkedIn and X. TheJoelTruth
Partner Center
Home Blog Design Understanding Data Presentations (Guide + Examples)
Understanding Data Presentations (Guide + Examples)
In this age of overwhelming information, the skill to effectively convey data has become extremely valuable. Initiating a discussion on data presentation types involves thoughtful consideration of the nature of your data and the message you aim to convey. Different types of visualizations serve distinct purposes. Whether you’re dealing with how to develop a report or simply trying to communicate complex information, how you present data influences how well your audience understands and engages with it. This extensive guide leads you through the different ways of data presentation.
Table of Contents
What is a Data Presentation?
What should a data presentation include, line graphs, treemap chart, scatter plot, how to choose a data presentation type, recommended data presentation templates, common mistakes done in data presentation.
A data presentation is a slide deck that aims to disclose quantitative information to an audience through the use of visual formats and narrative techniques derived from data analysis, making complex data understandable and actionable. This process requires a series of tools, such as charts, graphs, tables, infographics, dashboards, and so on, supported by concise textual explanations to improve understanding and boost retention rate.
Data presentations require us to cull data in a format that allows the presenter to highlight trends, patterns, and insights so that the audience can act upon the shared information. In a few words, the goal of data presentations is to enable viewers to grasp complicated concepts or trends quickly, facilitating informed decision-making or deeper analysis.
Data presentations go beyond the mere usage of graphical elements. Seasoned presenters encompass visuals with the art of data storytelling , so the speech skillfully connects the points through a narrative that resonates with the audience. Depending on the purpose – inspire, persuade, inform, support decision-making processes, etc. – is the data presentation format that is better suited to help us in this journey.
To nail your upcoming data presentation, ensure to count with the following elements:
- Clear Objectives: Understand the intent of your presentation before selecting the graphical layout and metaphors to make content easier to grasp.
- Engaging introduction: Use a powerful hook from the get-go. For instance, you can ask a big question or present a problem that your data will answer. Take a look at our guide on how to start a presentation for tips & insights.
- Structured Narrative: Your data presentation must tell a coherent story. This means a beginning where you present the context, a middle section in which you present the data, and an ending that uses a call-to-action. Check our guide on presentation structure for further information.
- Visual Elements: These are the charts, graphs, and other elements of visual communication we ought to use to present data. This article will cover one by one the different types of data representation methods we can use, and provide further guidance on choosing between them.
- Insights and Analysis: This is not just showcasing a graph and letting people get an idea about it. A proper data presentation includes the interpretation of that data, the reason why it’s included, and why it matters to your research.
- Conclusion & CTA: Ending your presentation with a call to action is necessary. Whether you intend to wow your audience into acquiring your services, inspire them to change the world, or whatever the purpose of your presentation, there must be a stage in which you convey all that you shared and show the path to staying in touch. Plan ahead whether you want to use a thank-you slide, a video presentation, or which method is apt and tailored to the kind of presentation you deliver.
- Q&A Session: After your speech is concluded, allocate 3-5 minutes for the audience to raise any questions about the information you disclosed. This is an extra chance to establish your authority on the topic. Check our guide on questions and answer sessions in presentations here.
Bar charts are a graphical representation of data using rectangular bars to show quantities or frequencies in an established category. They make it easy for readers to spot patterns or trends. Bar charts can be horizontal or vertical, although the vertical format is commonly known as a column chart. They display categorical, discrete, or continuous variables grouped in class intervals [1] . They include an axis and a set of labeled bars horizontally or vertically. These bars represent the frequencies of variable values or the values themselves. Numbers on the y-axis of a vertical bar chart or the x-axis of a horizontal bar chart are called the scale.
Real-Life Application of Bar Charts
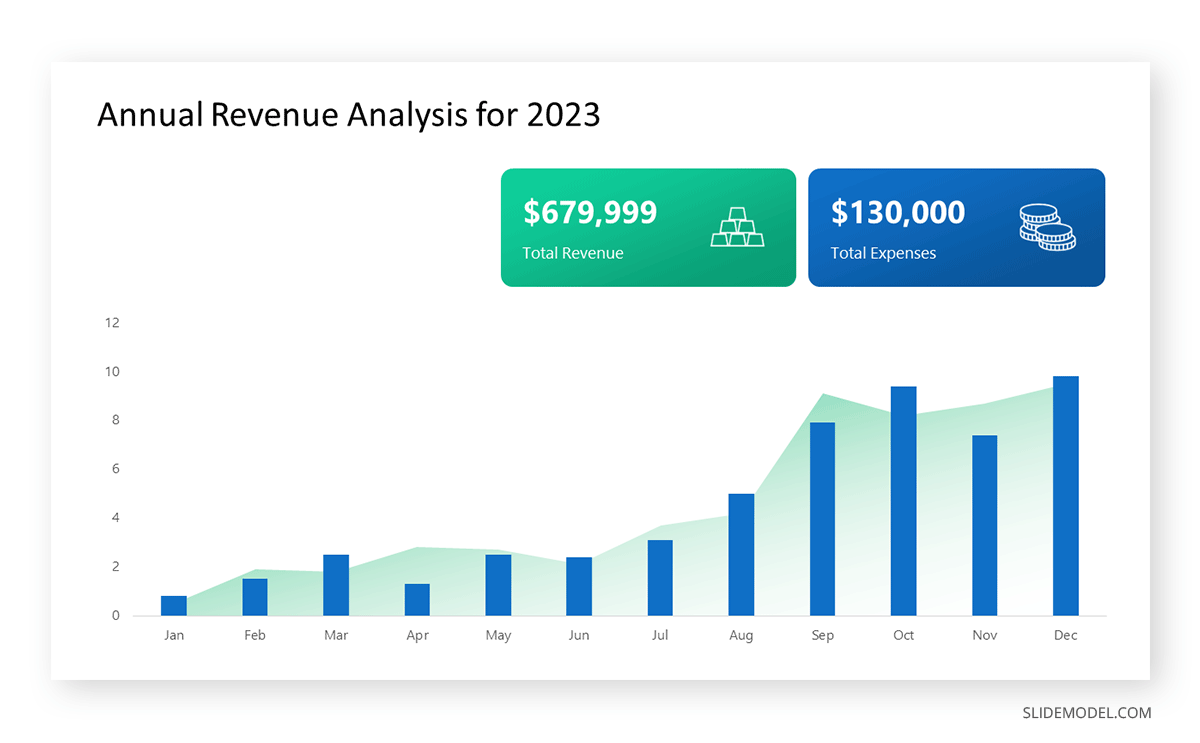
Let’s say a sales manager is presenting sales to their audience. Using a bar chart, he follows these steps.
Step 1: Selecting Data
The first step is to identify the specific data you will present to your audience.
The sales manager has highlighted these products for the presentation.
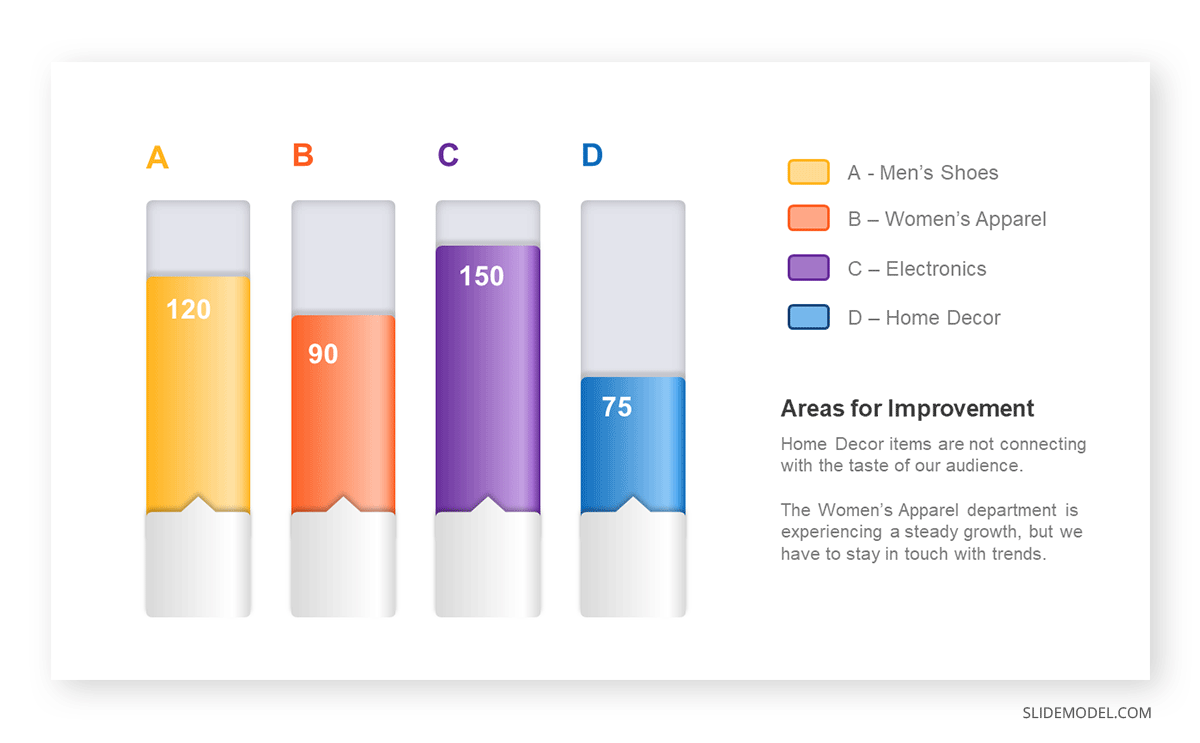
- Product A: Men’s Shoes
- Product B: Women’s Apparel
- Product C: Electronics
- Product D: Home Decor
Step 2: Choosing Orientation
Opt for a vertical layout for simplicity. Vertical bar charts help compare different categories in case there are not too many categories [1] . They can also help show different trends. A vertical bar chart is used where each bar represents one of the four chosen products. After plotting the data, it is seen that the height of each bar directly represents the sales performance of the respective product.
It is visible that the tallest bar (Electronics – Product C) is showing the highest sales. However, the shorter bars (Women’s Apparel – Product B and Home Decor – Product D) need attention. It indicates areas that require further analysis or strategies for improvement.
Step 3: Colorful Insights
Different colors are used to differentiate each product. It is essential to show a color-coded chart where the audience can distinguish between products.
- Men’s Shoes (Product A): Yellow
- Women’s Apparel (Product B): Orange
- Electronics (Product C): Violet
- Home Decor (Product D): Blue
Bar charts are straightforward and easily understandable for presenting data. They are versatile when comparing products or any categorical data [2] . Bar charts adapt seamlessly to retail scenarios. Despite that, bar charts have a few shortcomings. They cannot illustrate data trends over time. Besides, overloading the chart with numerous products can lead to visual clutter, diminishing its effectiveness.
For more information, check our collection of bar chart templates for PowerPoint .
Line graphs help illustrate data trends, progressions, or fluctuations by connecting a series of data points called ‘markers’ with straight line segments. This provides a straightforward representation of how values change [5] . Their versatility makes them invaluable for scenarios requiring a visual understanding of continuous data. In addition, line graphs are also useful for comparing multiple datasets over the same timeline. Using multiple line graphs allows us to compare more than one data set. They simplify complex information so the audience can quickly grasp the ups and downs of values. From tracking stock prices to analyzing experimental results, you can use line graphs to show how data changes over a continuous timeline. They show trends with simplicity and clarity.
Real-life Application of Line Graphs
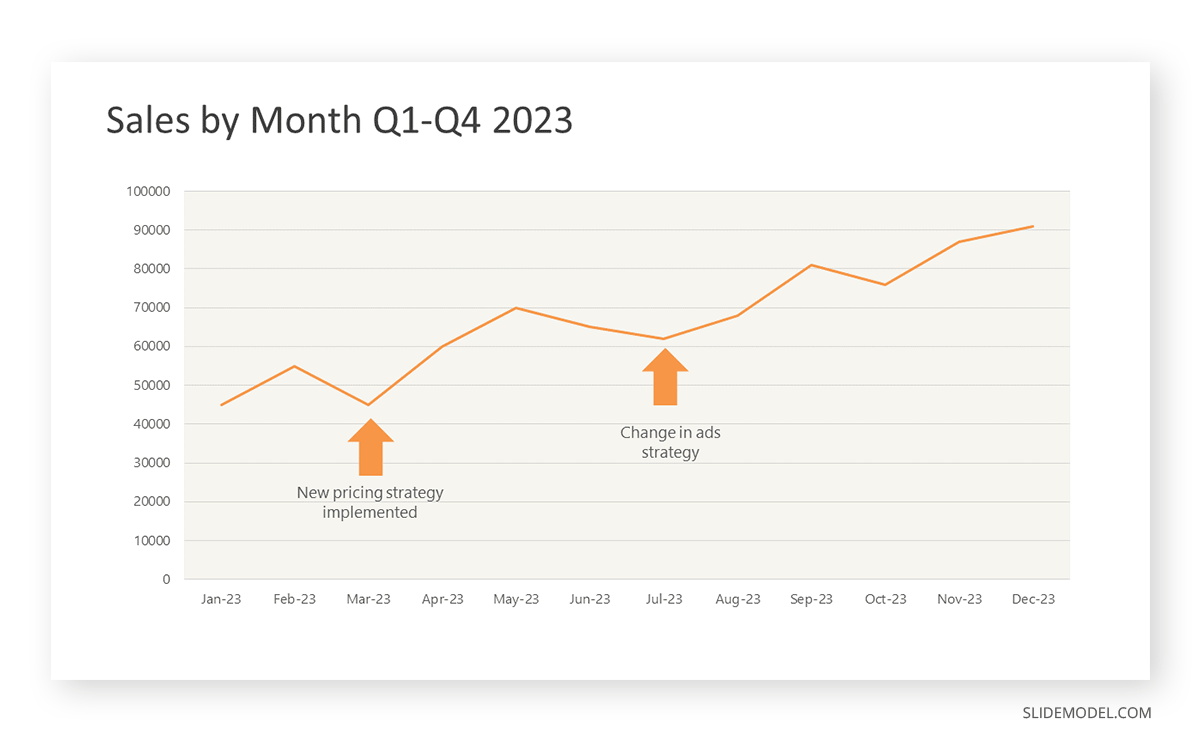
To understand line graphs thoroughly, we will use a real case. Imagine you’re a financial analyst presenting a tech company’s monthly sales for a licensed product over the past year. Investors want insights into sales behavior by month, how market trends may have influenced sales performance and reception to the new pricing strategy. To present data via a line graph, you will complete these steps.
First, you need to gather the data. In this case, your data will be the sales numbers. For example:
- January: $45,000
- February: $55,000
- March: $45,000
- April: $60,000
- May: $ 70,000
- June: $65,000
- July: $62,000
- August: $68,000
- September: $81,000
- October: $76,000
- November: $87,000
- December: $91,000
After choosing the data, the next step is to select the orientation. Like bar charts, you can use vertical or horizontal line graphs. However, we want to keep this simple, so we will keep the timeline (x-axis) horizontal while the sales numbers (y-axis) vertical.
Step 3: Connecting Trends
After adding the data to your preferred software, you will plot a line graph. In the graph, each month’s sales are represented by data points connected by a line.
Step 4: Adding Clarity with Color
If there are multiple lines, you can also add colors to highlight each one, making it easier to follow.
Line graphs excel at visually presenting trends over time. These presentation aids identify patterns, like upward or downward trends. However, too many data points can clutter the graph, making it harder to interpret. Line graphs work best with continuous data but are not suitable for categories.
For more information, check our collection of line chart templates for PowerPoint and our article about how to make a presentation graph .
A data dashboard is a visual tool for analyzing information. Different graphs, charts, and tables are consolidated in a layout to showcase the information required to achieve one or more objectives. Dashboards help quickly see Key Performance Indicators (KPIs). You don’t make new visuals in the dashboard; instead, you use it to display visuals you’ve already made in worksheets [3] .
Keeping the number of visuals on a dashboard to three or four is recommended. Adding too many can make it hard to see the main points [4]. Dashboards can be used for business analytics to analyze sales, revenue, and marketing metrics at a time. They are also used in the manufacturing industry, as they allow users to grasp the entire production scenario at the moment while tracking the core KPIs for each line.
Real-Life Application of a Dashboard
Consider a project manager presenting a software development project’s progress to a tech company’s leadership team. He follows the following steps.
Step 1: Defining Key Metrics
To effectively communicate the project’s status, identify key metrics such as completion status, budget, and bug resolution rates. Then, choose measurable metrics aligned with project objectives.
Step 2: Choosing Visualization Widgets
After finalizing the data, presentation aids that align with each metric are selected. For this project, the project manager chooses a progress bar for the completion status and uses bar charts for budget allocation. Likewise, he implements line charts for bug resolution rates.
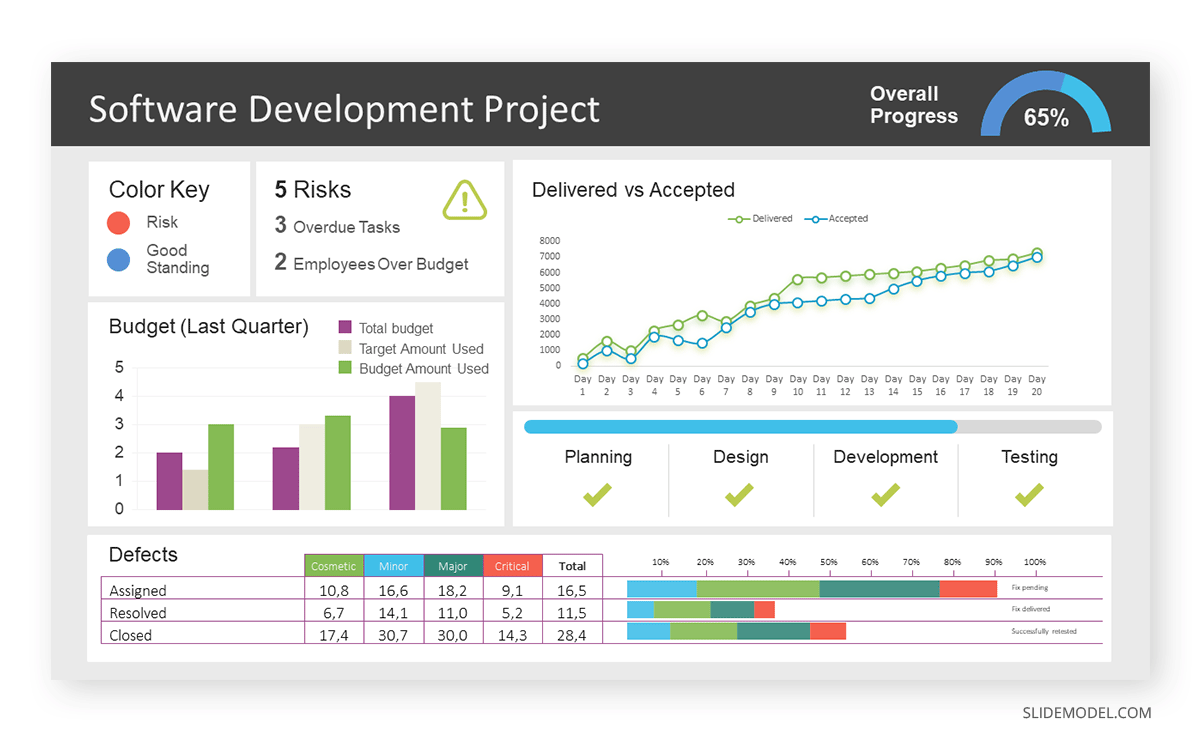
Step 3: Dashboard Layout
Key metrics are prominently placed in the dashboard for easy visibility, and the manager ensures that it appears clean and organized.
Dashboards provide a comprehensive view of key project metrics. Users can interact with data, customize views, and drill down for detailed analysis. However, creating an effective dashboard requires careful planning to avoid clutter. Besides, dashboards rely on the availability and accuracy of underlying data sources.
For more information, check our article on how to design a dashboard presentation , and discover our collection of dashboard PowerPoint templates .
Treemap charts represent hierarchical data structured in a series of nested rectangles [6] . As each branch of the ‘tree’ is given a rectangle, smaller tiles can be seen representing sub-branches, meaning elements on a lower hierarchical level than the parent rectangle. Each one of those rectangular nodes is built by representing an area proportional to the specified data dimension.
Treemaps are useful for visualizing large datasets in compact space. It is easy to identify patterns, such as which categories are dominant. Common applications of the treemap chart are seen in the IT industry, such as resource allocation, disk space management, website analytics, etc. Also, they can be used in multiple industries like healthcare data analysis, market share across different product categories, or even in finance to visualize portfolios.
Real-Life Application of a Treemap Chart
Let’s consider a financial scenario where a financial team wants to represent the budget allocation of a company. There is a hierarchy in the process, so it is helpful to use a treemap chart. In the chart, the top-level rectangle could represent the total budget, and it would be subdivided into smaller rectangles, each denoting a specific department. Further subdivisions within these smaller rectangles might represent individual projects or cost categories.
Step 1: Define Your Data Hierarchy
While presenting data on the budget allocation, start by outlining the hierarchical structure. The sequence will be like the overall budget at the top, followed by departments, projects within each department, and finally, individual cost categories for each project.
- Top-level rectangle: Total Budget
- Second-level rectangles: Departments (Engineering, Marketing, Sales)
- Third-level rectangles: Projects within each department
- Fourth-level rectangles: Cost categories for each project (Personnel, Marketing Expenses, Equipment)
Step 2: Choose a Suitable Tool
It’s time to select a data visualization tool supporting Treemaps. Popular choices include Tableau, Microsoft Power BI, PowerPoint, or even coding with libraries like D3.js. It is vital to ensure that the chosen tool provides customization options for colors, labels, and hierarchical structures.
Here, the team uses PowerPoint for this guide because of its user-friendly interface and robust Treemap capabilities.
Step 3: Make a Treemap Chart with PowerPoint
After opening the PowerPoint presentation, they chose “SmartArt” to form the chart. The SmartArt Graphic window has a “Hierarchy” category on the left. Here, you will see multiple options. You can choose any layout that resembles a Treemap. The “Table Hierarchy” or “Organization Chart” options can be adapted. The team selects the Table Hierarchy as it looks close to a Treemap.
Step 5: Input Your Data
After that, a new window will open with a basic structure. They add the data one by one by clicking on the text boxes. They start with the top-level rectangle, representing the total budget.
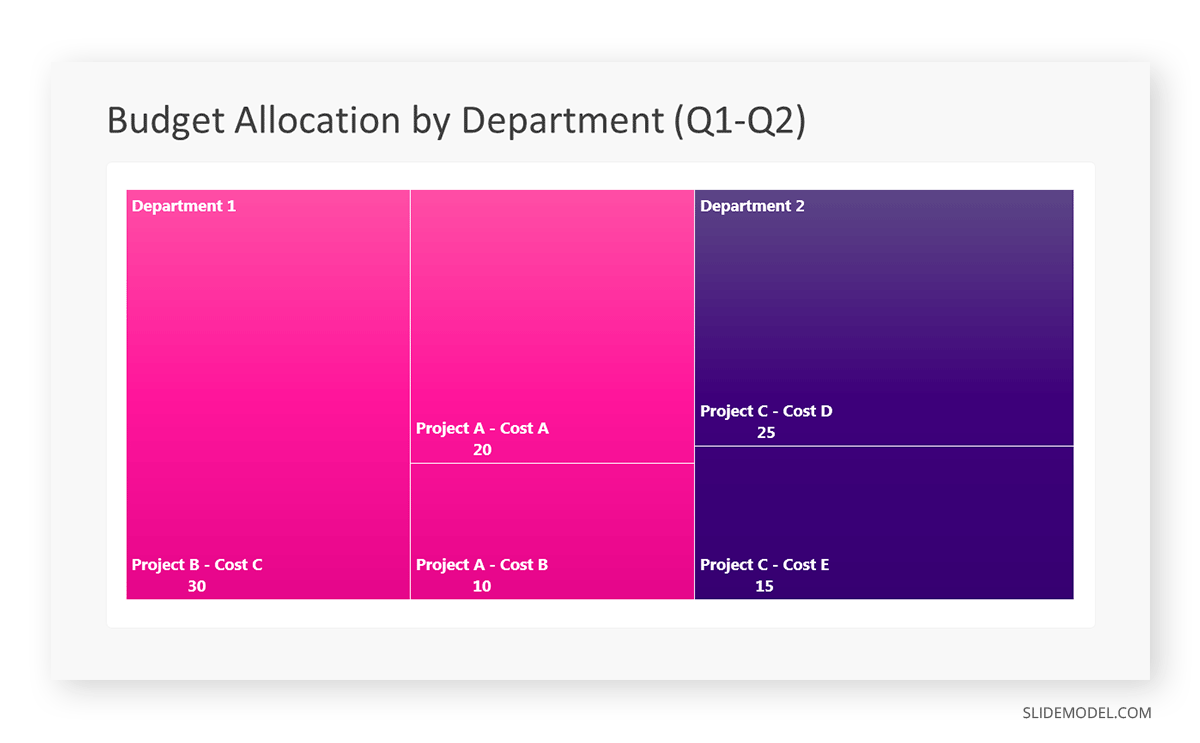
Step 6: Customize the Treemap
By clicking on each shape, they customize its color, size, and label. At the same time, they can adjust the font size, style, and color of labels by using the options in the “Format” tab in PowerPoint. Using different colors for each level enhances the visual difference.
Treemaps excel at illustrating hierarchical structures. These charts make it easy to understand relationships and dependencies. They efficiently use space, compactly displaying a large amount of data, reducing the need for excessive scrolling or navigation. Additionally, using colors enhances the understanding of data by representing different variables or categories.
In some cases, treemaps might become complex, especially with deep hierarchies. It becomes challenging for some users to interpret the chart. At the same time, displaying detailed information within each rectangle might be constrained by space. It potentially limits the amount of data that can be shown clearly. Without proper labeling and color coding, there’s a risk of misinterpretation.
A heatmap is a data visualization tool that uses color coding to represent values across a two-dimensional surface. In these, colors replace numbers to indicate the magnitude of each cell. This color-shaded matrix display is valuable for summarizing and understanding data sets with a glance [7] . The intensity of the color corresponds to the value it represents, making it easy to identify patterns, trends, and variations in the data.
As a tool, heatmaps help businesses analyze website interactions, revealing user behavior patterns and preferences to enhance overall user experience. In addition, companies use heatmaps to assess content engagement, identifying popular sections and areas of improvement for more effective communication. They excel at highlighting patterns and trends in large datasets, making it easy to identify areas of interest.
We can implement heatmaps to express multiple data types, such as numerical values, percentages, or even categorical data. Heatmaps help us easily spot areas with lots of activity, making them helpful in figuring out clusters [8] . When making these maps, it is important to pick colors carefully. The colors need to show the differences between groups or levels of something. And it is good to use colors that people with colorblindness can easily see.
Check our detailed guide on how to create a heatmap here. Also discover our collection of heatmap PowerPoint templates .
Pie charts are circular statistical graphics divided into slices to illustrate numerical proportions. Each slice represents a proportionate part of the whole, making it easy to visualize the contribution of each component to the total.
The size of the pie charts is influenced by the value of data points within each pie. The total of all data points in a pie determines its size. The pie with the highest data points appears as the largest, whereas the others are proportionally smaller. However, you can present all pies of the same size if proportional representation is not required [9] . Sometimes, pie charts are difficult to read, or additional information is required. A variation of this tool can be used instead, known as the donut chart , which has the same structure but a blank center, creating a ring shape. Presenters can add extra information, and the ring shape helps to declutter the graph.
Pie charts are used in business to show percentage distribution, compare relative sizes of categories, or present straightforward data sets where visualizing ratios is essential.
Real-Life Application of Pie Charts
Consider a scenario where you want to represent the distribution of the data. Each slice of the pie chart would represent a different category, and the size of each slice would indicate the percentage of the total portion allocated to that category.
Step 1: Define Your Data Structure
Imagine you are presenting the distribution of a project budget among different expense categories.
- Column A: Expense Categories (Personnel, Equipment, Marketing, Miscellaneous)
- Column B: Budget Amounts ($40,000, $30,000, $20,000, $10,000) Column B represents the values of your categories in Column A.
Step 2: Insert a Pie Chart
Using any of the accessible tools, you can create a pie chart. The most convenient tools for forming a pie chart in a presentation are presentation tools such as PowerPoint or Google Slides. You will notice that the pie chart assigns each expense category a percentage of the total budget by dividing it by the total budget.
For instance:
- Personnel: $40,000 / ($40,000 + $30,000 + $20,000 + $10,000) = 40%
- Equipment: $30,000 / ($40,000 + $30,000 + $20,000 + $10,000) = 30%
- Marketing: $20,000 / ($40,000 + $30,000 + $20,000 + $10,000) = 20%
- Miscellaneous: $10,000 / ($40,000 + $30,000 + $20,000 + $10,000) = 10%
You can make a chart out of this or just pull out the pie chart from the data.
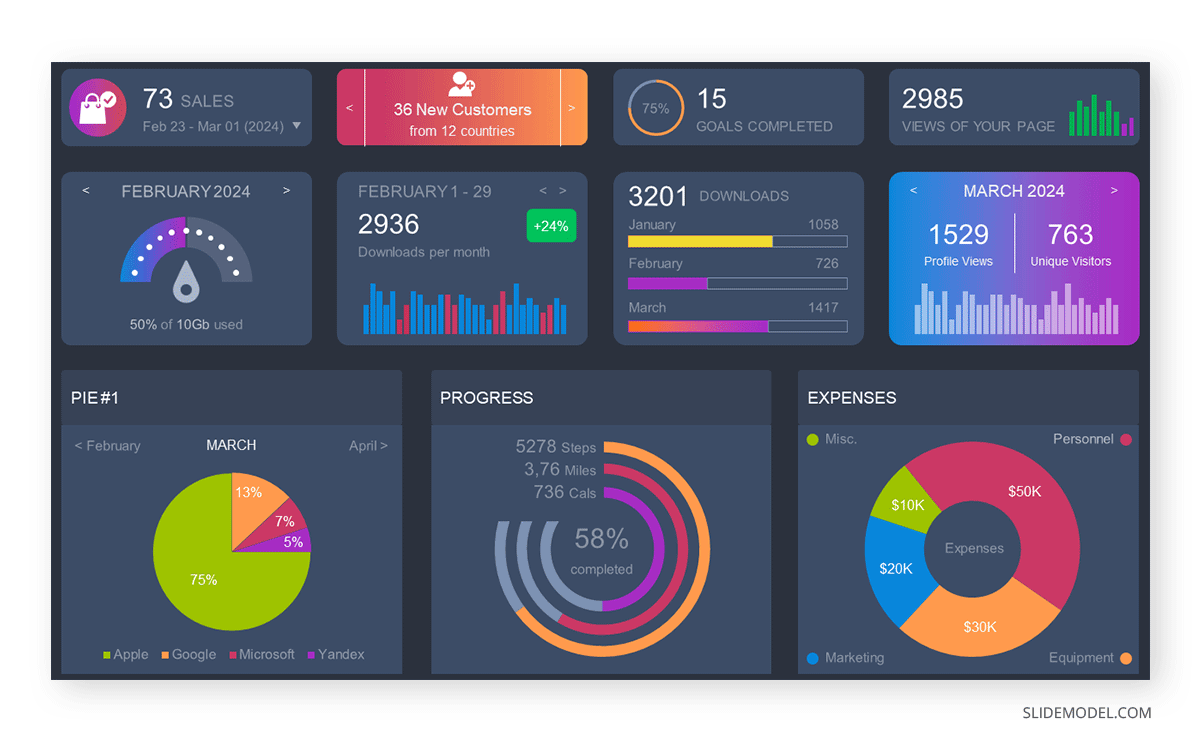
3D pie charts and 3D donut charts are quite popular among the audience. They stand out as visual elements in any presentation slide, so let’s take a look at how our pie chart example would look in 3D pie chart format.
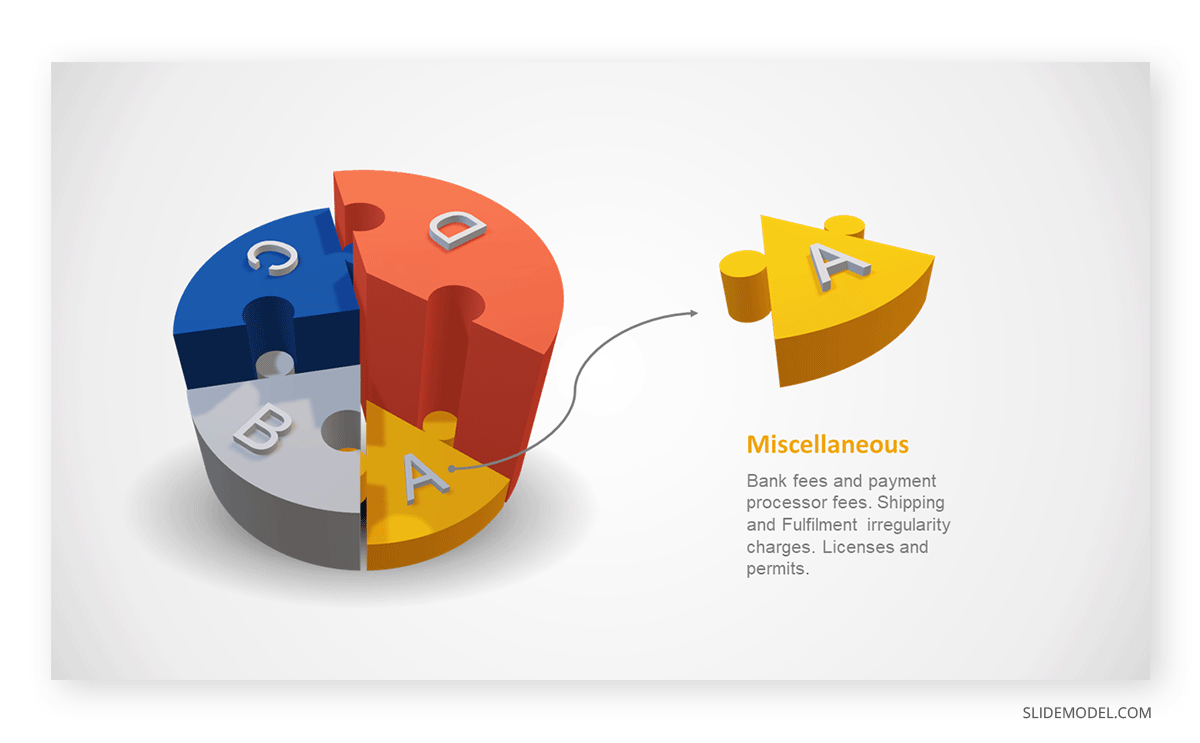
Step 03: Results Interpretation
The pie chart visually illustrates the distribution of the project budget among different expense categories. Personnel constitutes the largest portion at 40%, followed by equipment at 30%, marketing at 20%, and miscellaneous at 10%. This breakdown provides a clear overview of where the project funds are allocated, which helps in informed decision-making and resource management. It is evident that personnel are a significant investment, emphasizing their importance in the overall project budget.
Pie charts provide a straightforward way to represent proportions and percentages. They are easy to understand, even for individuals with limited data analysis experience. These charts work well for small datasets with a limited number of categories.
However, a pie chart can become cluttered and less effective in situations with many categories. Accurate interpretation may be challenging, especially when dealing with slight differences in slice sizes. In addition, these charts are static and do not effectively convey trends over time.
For more information, check our collection of pie chart templates for PowerPoint .
Histograms present the distribution of numerical variables. Unlike a bar chart that records each unique response separately, histograms organize numeric responses into bins and show the frequency of reactions within each bin [10] . The x-axis of a histogram shows the range of values for a numeric variable. At the same time, the y-axis indicates the relative frequencies (percentage of the total counts) for that range of values.
Whenever you want to understand the distribution of your data, check which values are more common, or identify outliers, histograms are your go-to. Think of them as a spotlight on the story your data is telling. A histogram can provide a quick and insightful overview if you’re curious about exam scores, sales figures, or any numerical data distribution.
Real-Life Application of a Histogram
In the histogram data analysis presentation example, imagine an instructor analyzing a class’s grades to identify the most common score range. A histogram could effectively display the distribution. It will show whether most students scored in the average range or if there are significant outliers.
Step 1: Gather Data
He begins by gathering the data. The scores of each student in class are gathered to analyze exam scores.
After arranging the scores in ascending order, bin ranges are set.
Step 2: Define Bins
Bins are like categories that group similar values. Think of them as buckets that organize your data. The presenter decides how wide each bin should be based on the range of the values. For instance, the instructor sets the bin ranges based on score intervals: 60-69, 70-79, 80-89, and 90-100.

Step 3: Count Frequency
Now, he counts how many data points fall into each bin. This step is crucial because it tells you how often specific ranges of values occur. The result is the frequency distribution, showing the occurrences of each group.
Here, the instructor counts the number of students in each category.
- 60-69: 1 student (Kate)
- 70-79: 4 students (David, Emma, Grace, Jack)
- 80-89: 7 students (Alice, Bob, Frank, Isabel, Liam, Mia, Noah)
- 90-100: 3 students (Clara, Henry, Olivia)
Step 4: Create the Histogram
It’s time to turn the data into a visual representation. Draw a bar for each bin on a graph. The width of the bar should correspond to the range of the bin, and the height should correspond to the frequency. To make your histogram understandable, label the X and Y axes.
In this case, the X-axis should represent the bins (e.g., test score ranges), and the Y-axis represents the frequency.
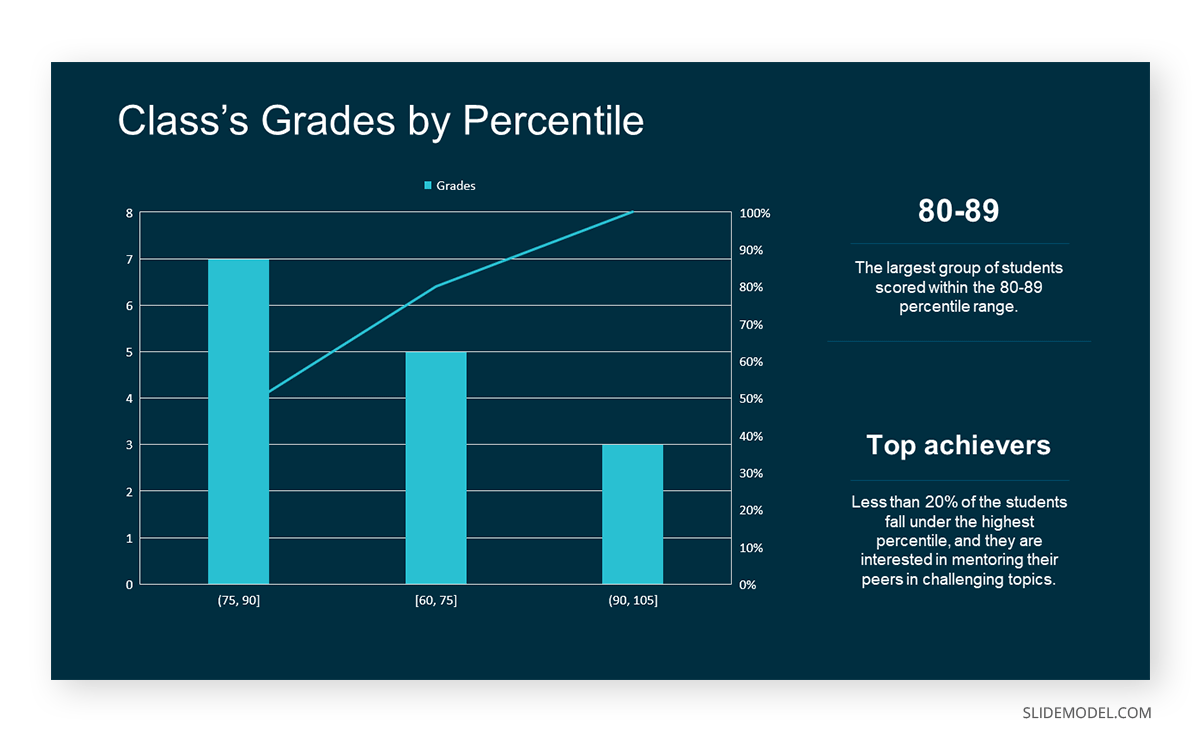
The histogram of the class grades reveals insightful patterns in the distribution. Most students, with seven students, fall within the 80-89 score range. The histogram provides a clear visualization of the class’s performance. It showcases a concentration of grades in the upper-middle range with few outliers at both ends. This analysis helps in understanding the overall academic standing of the class. It also identifies the areas for potential improvement or recognition.
Thus, histograms provide a clear visual representation of data distribution. They are easy to interpret, even for those without a statistical background. They apply to various types of data, including continuous and discrete variables. One weak point is that histograms do not capture detailed patterns in students’ data, with seven compared to other visualization methods.
A scatter plot is a graphical representation of the relationship between two variables. It consists of individual data points on a two-dimensional plane. This plane plots one variable on the x-axis and the other on the y-axis. Each point represents a unique observation. It visualizes patterns, trends, or correlations between the two variables.
Scatter plots are also effective in revealing the strength and direction of relationships. They identify outliers and assess the overall distribution of data points. The points’ dispersion and clustering reflect the relationship’s nature, whether it is positive, negative, or lacks a discernible pattern. In business, scatter plots assess relationships between variables such as marketing cost and sales revenue. They help present data correlations and decision-making.
Real-Life Application of Scatter Plot
A group of scientists is conducting a study on the relationship between daily hours of screen time and sleep quality. After reviewing the data, they managed to create this table to help them build a scatter plot graph:
In the provided example, the x-axis represents Daily Hours of Screen Time, and the y-axis represents the Sleep Quality Rating.
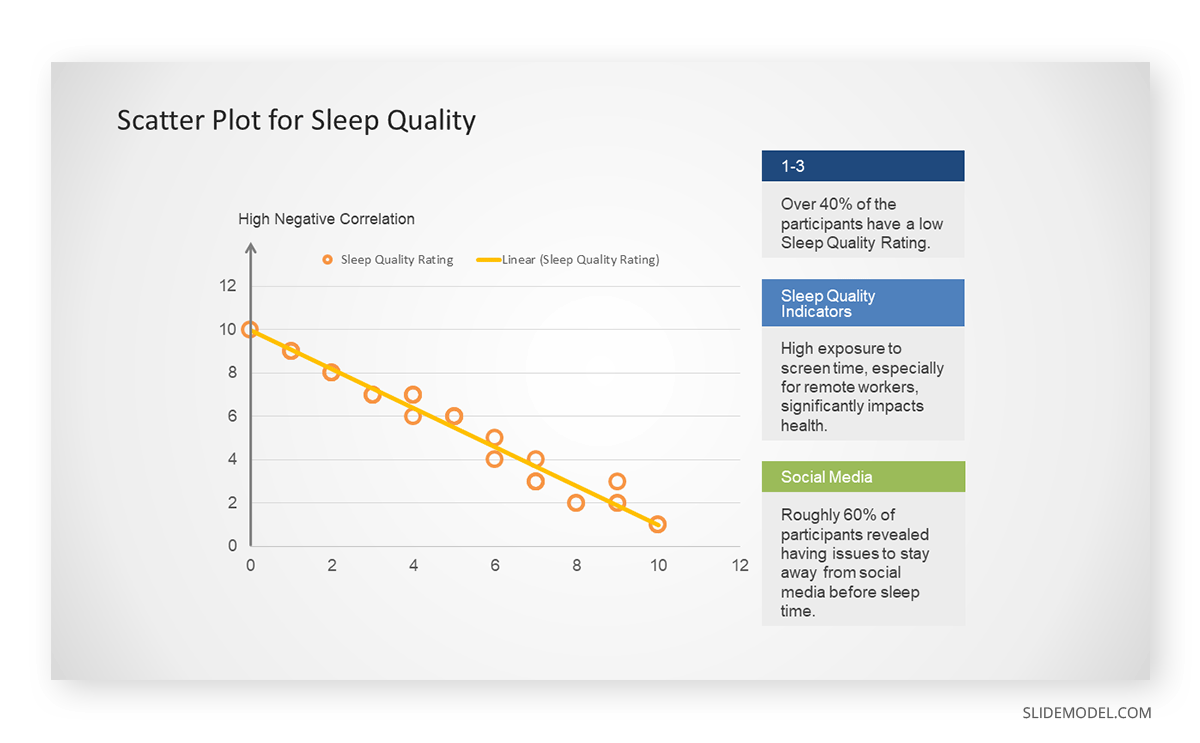
The scientists observe a negative correlation between the amount of screen time and the quality of sleep. This is consistent with their hypothesis that blue light, especially before bedtime, has a significant impact on sleep quality and metabolic processes.
There are a few things to remember when using a scatter plot. Even when a scatter diagram indicates a relationship, it doesn’t mean one variable affects the other. A third factor can influence both variables. The more the plot resembles a straight line, the stronger the relationship is perceived [11] . If it suggests no ties, the observed pattern might be due to random fluctuations in data. When the scatter diagram depicts no correlation, whether the data might be stratified is worth considering.
Choosing the appropriate data presentation type is crucial when making a presentation . Understanding the nature of your data and the message you intend to convey will guide this selection process. For instance, when showcasing quantitative relationships, scatter plots become instrumental in revealing correlations between variables. If the focus is on emphasizing parts of a whole, pie charts offer a concise display of proportions. Histograms, on the other hand, prove valuable for illustrating distributions and frequency patterns.
Bar charts provide a clear visual comparison of different categories. Likewise, line charts excel in showcasing trends over time, while tables are ideal for detailed data examination. Starting a presentation on data presentation types involves evaluating the specific information you want to communicate and selecting the format that aligns with your message. This ensures clarity and resonance with your audience from the beginning of your presentation.
1. Fact Sheet Dashboard for Data Presentation
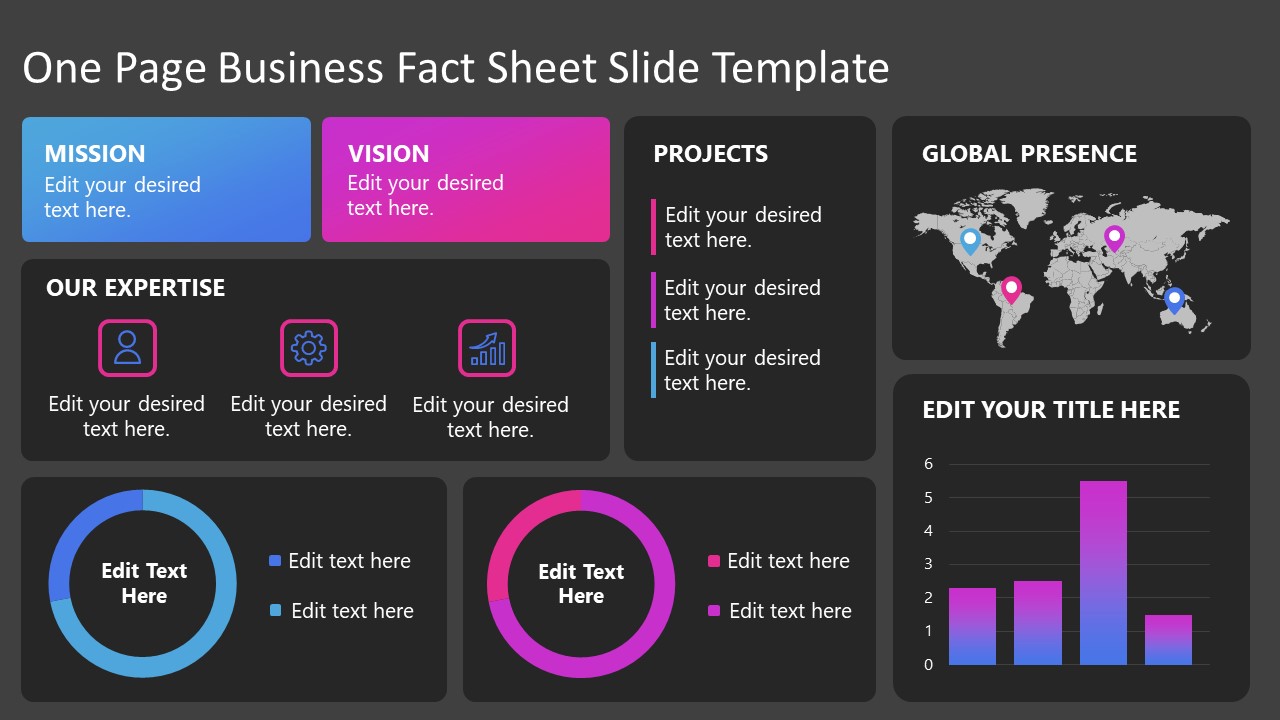
Convey all the data you need to present in this one-pager format, an ideal solution tailored for users looking for presentation aids. Global maps, donut chats, column graphs, and text neatly arranged in a clean layout presented in light and dark themes.
Use This Template
2. 3D Column Chart Infographic PPT Template
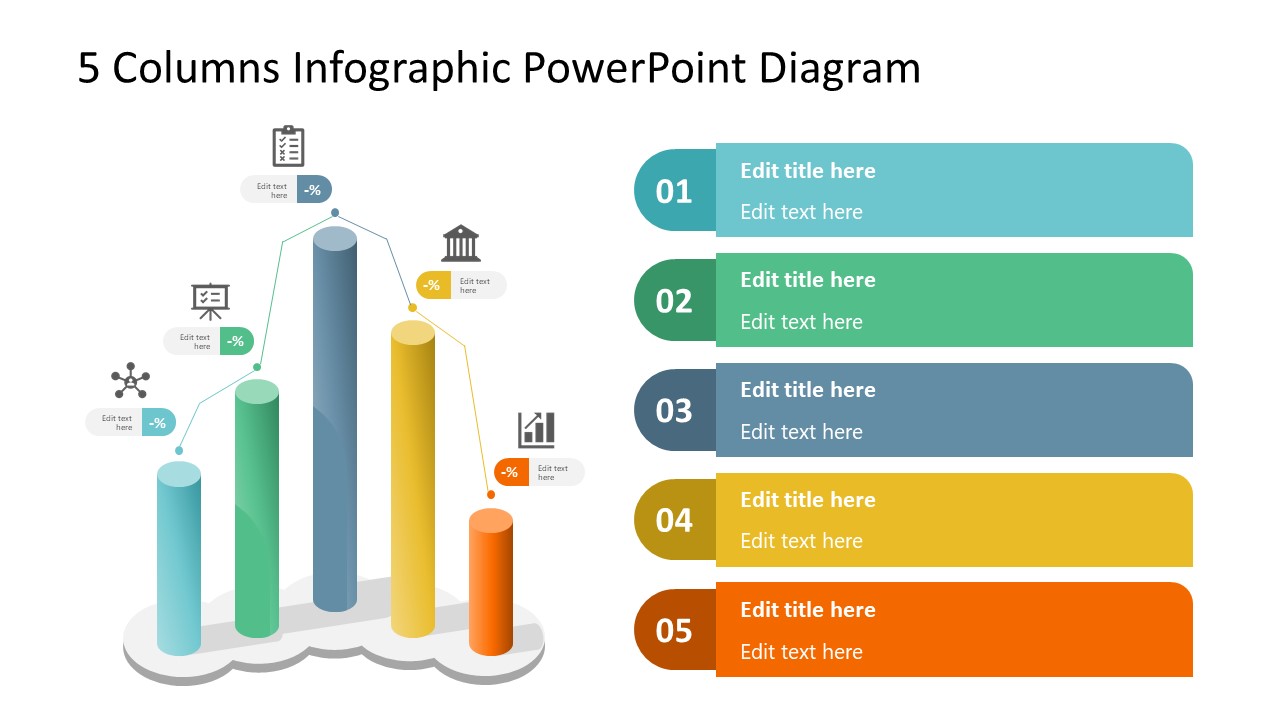
Represent column charts in a highly visual 3D format with this PPT template. A creative way to present data, this template is entirely editable, and we can craft either a one-page infographic or a series of slides explaining what we intend to disclose point by point.
3. Data Circles Infographic PowerPoint Template
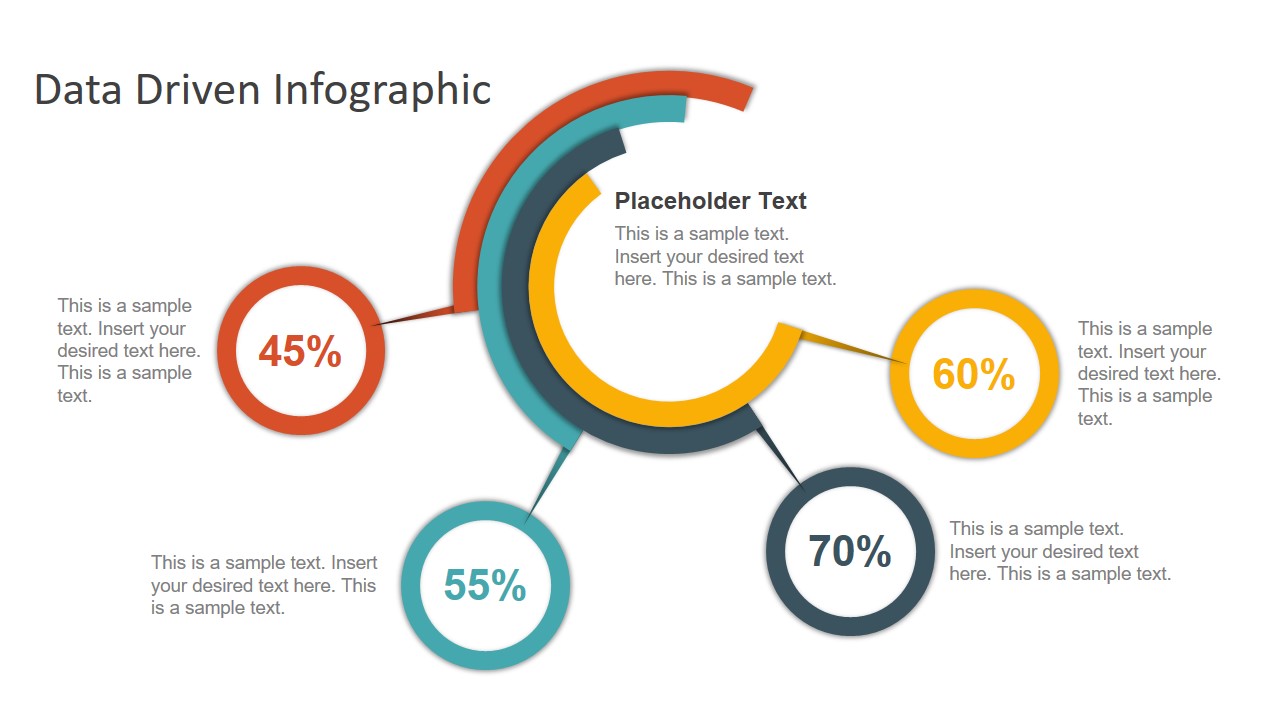
An alternative to the pie chart and donut chart diagrams, this template features a series of curved shapes with bubble callouts as ways of presenting data. Expand the information for each arch in the text placeholder areas.
4. Colorful Metrics Dashboard for Data Presentation
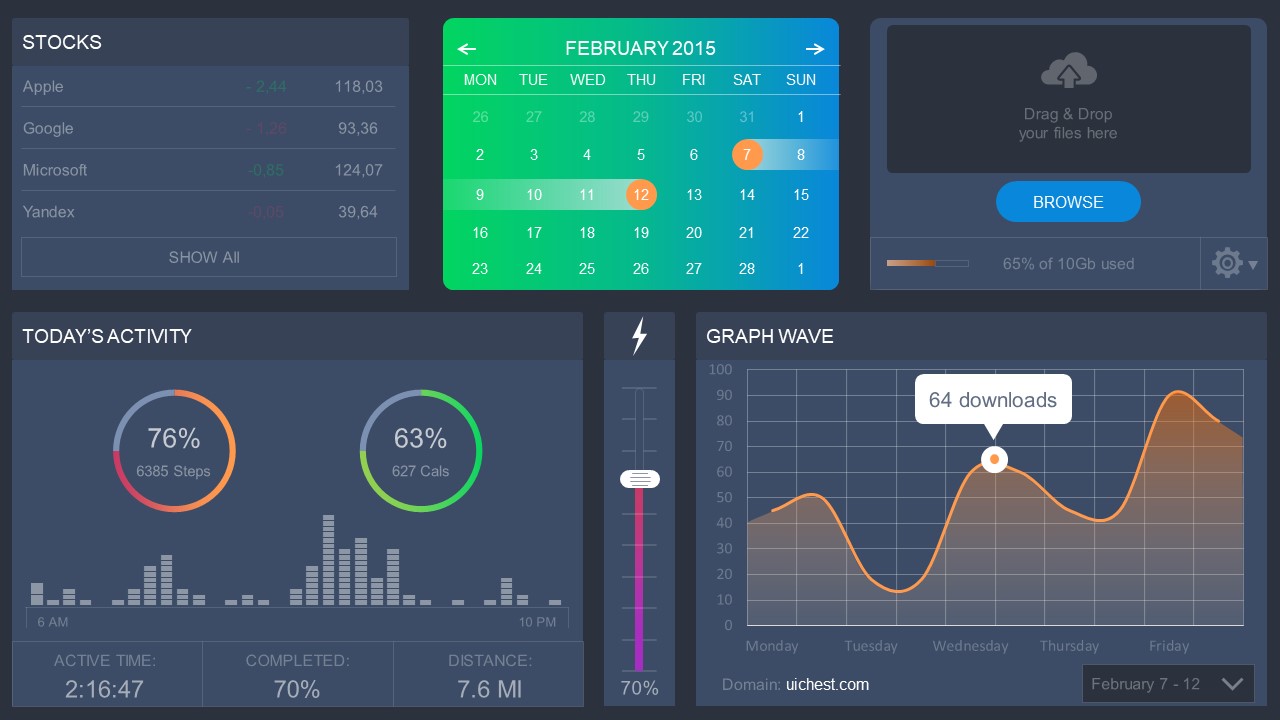
This versatile dashboard template helps us in the presentation of the data by offering several graphs and methods to convert numbers into graphics. Implement it for e-commerce projects, financial projections, project development, and more.
5. Animated Data Presentation Tools for PowerPoint & Google Slides
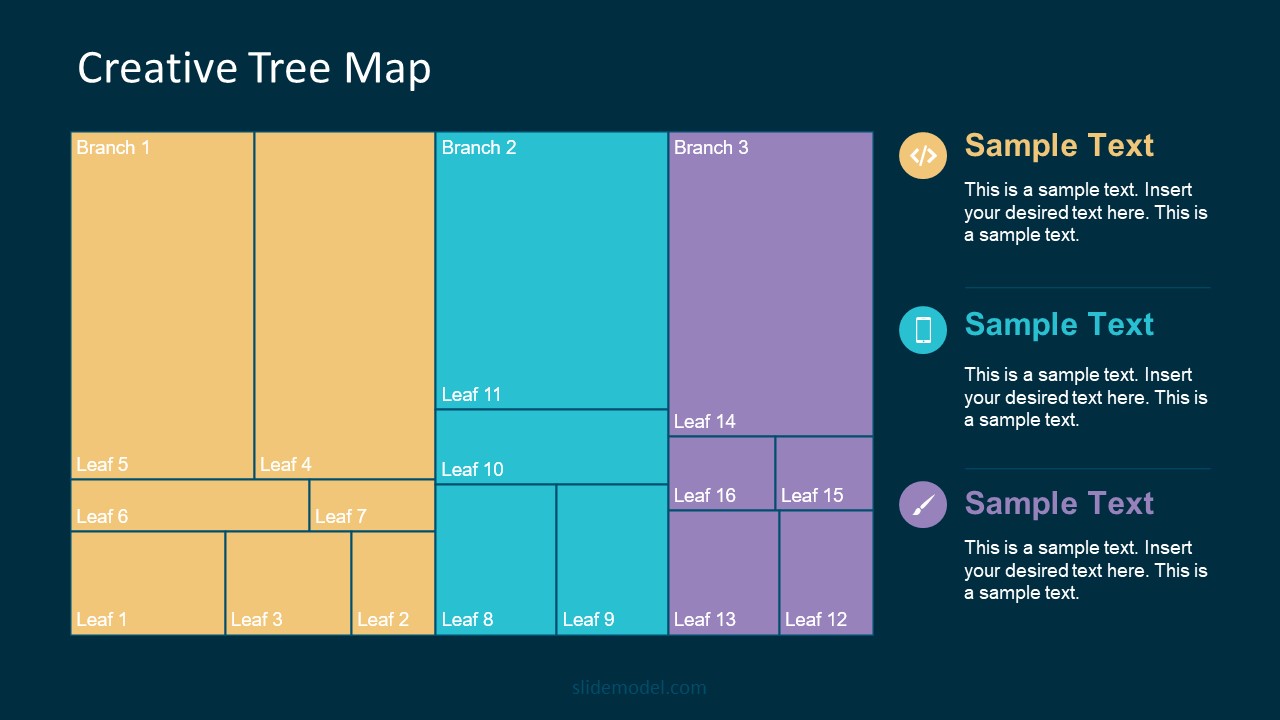
A slide deck filled with most of the tools mentioned in this article, from bar charts, column charts, treemap graphs, pie charts, histogram, etc. Animated effects make each slide look dynamic when sharing data with stakeholders.
6. Statistics Waffle Charts PPT Template for Data Presentations
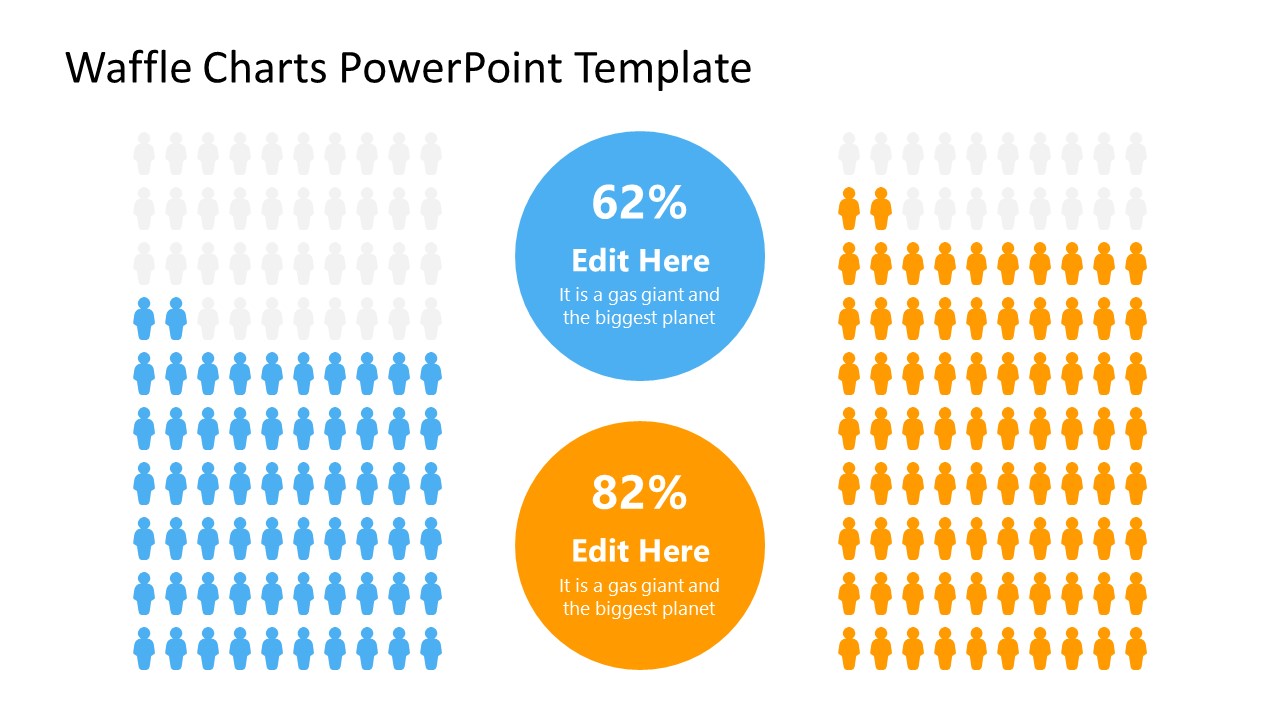
This PPT template helps us how to present data beyond the typical pie chart representation. It is widely used for demographics, so it’s a great fit for marketing teams, data science professionals, HR personnel, and more.
7. Data Presentation Dashboard Template for Google Slides
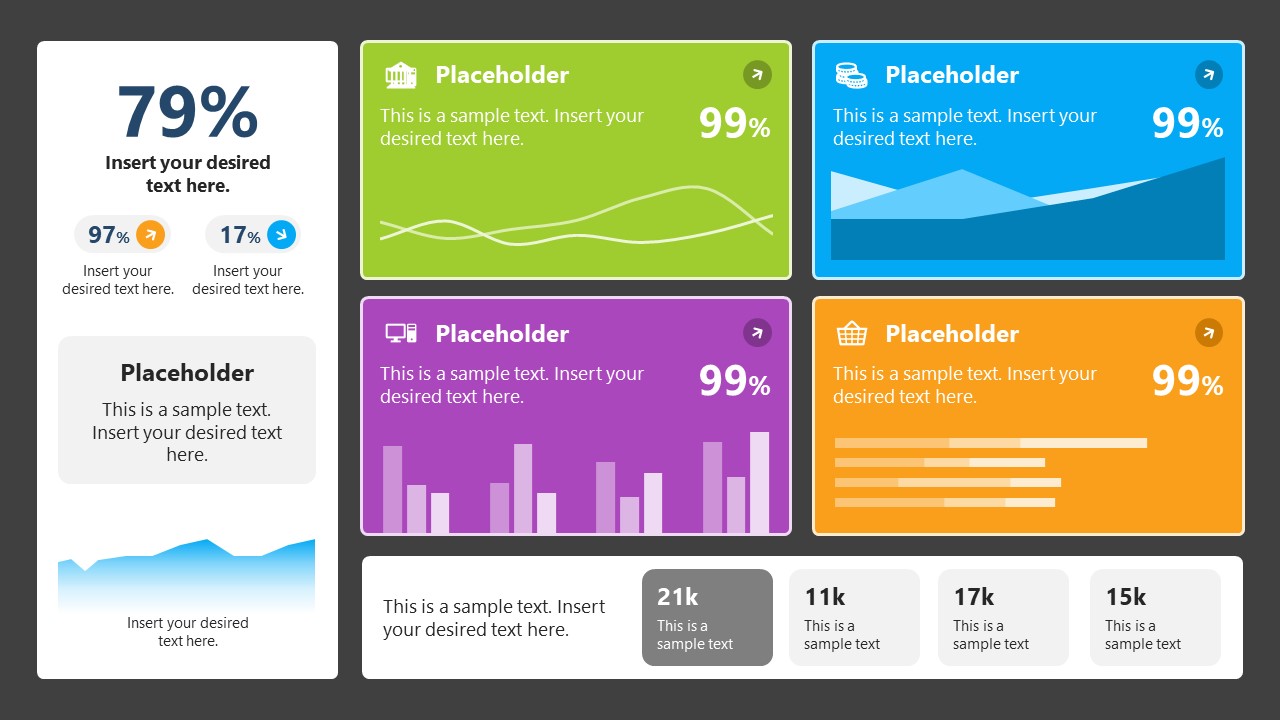
A compendium of tools in dashboard format featuring line graphs, bar charts, column charts, and neatly arranged placeholder text areas.
8. Weather Dashboard for Data Presentation
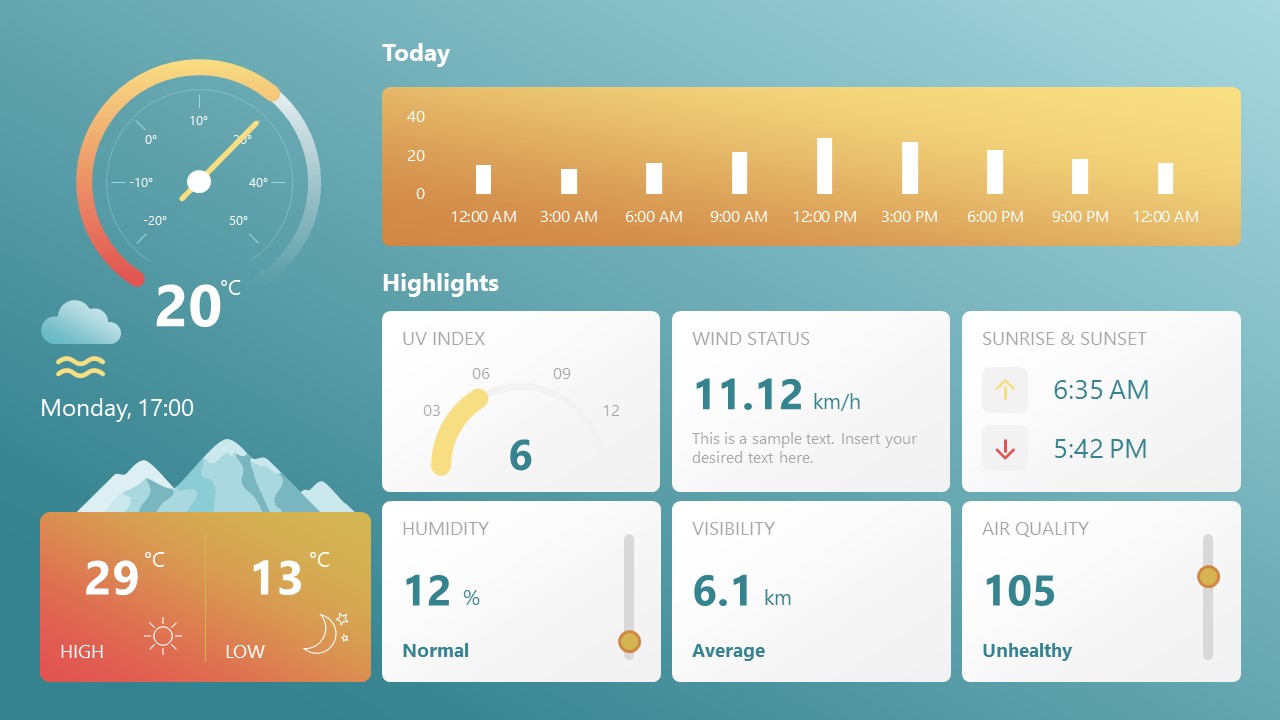
Share weather data for agricultural presentation topics, environmental studies, or any kind of presentation that requires a highly visual layout for weather forecasting on a single day. Two color themes are available.
9. Social Media Marketing Dashboard Data Presentation Template
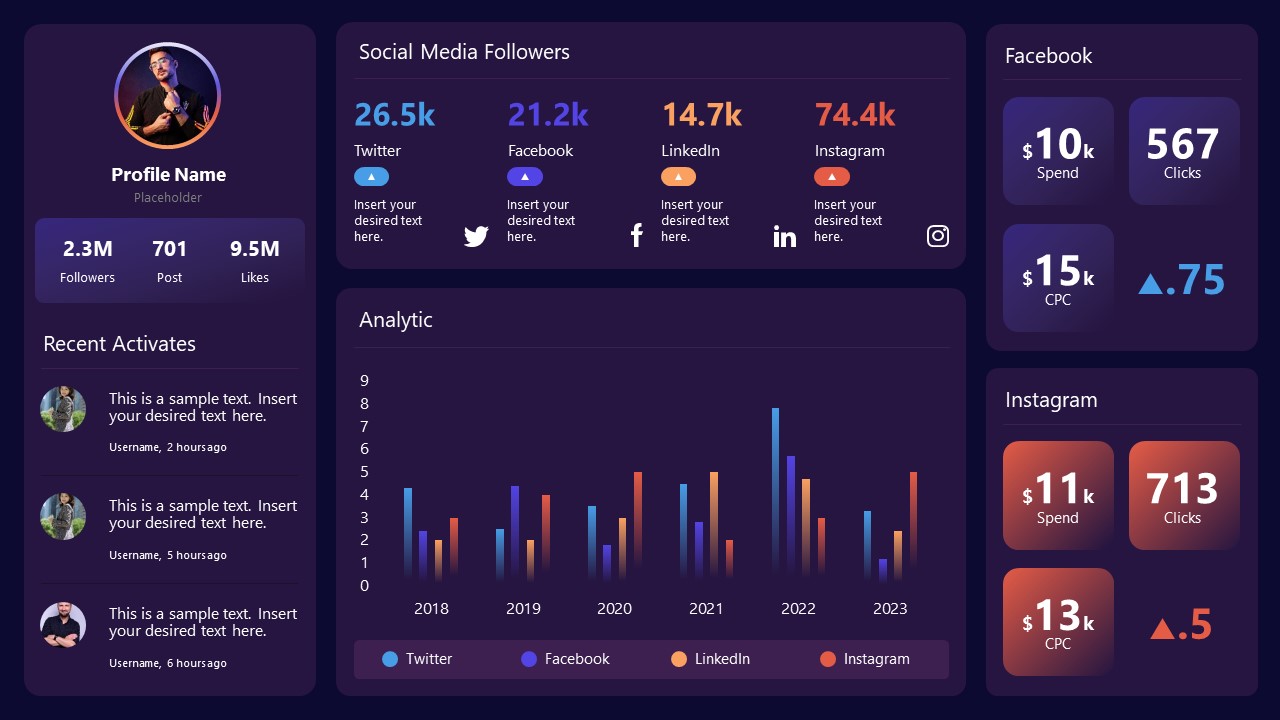
Intended for marketing professionals, this dashboard template for data presentation is a tool for presenting data analytics from social media channels. Two slide layouts featuring line graphs and column charts.
10. Project Management Summary Dashboard Template
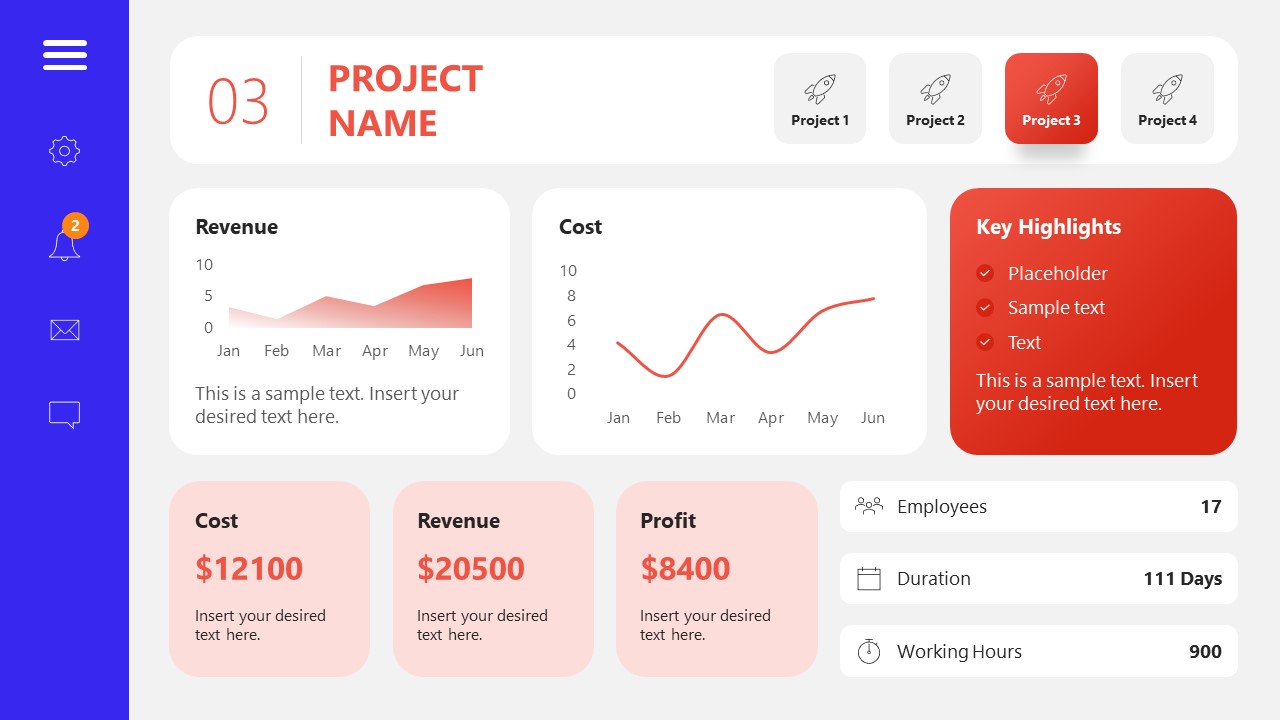
A tool crafted for project managers to deliver highly visual reports on a project’s completion, the profits it delivered for the company, and expenses/time required to execute it. 4 different color layouts are available.
11. Profit & Loss Dashboard for PowerPoint and Google Slides
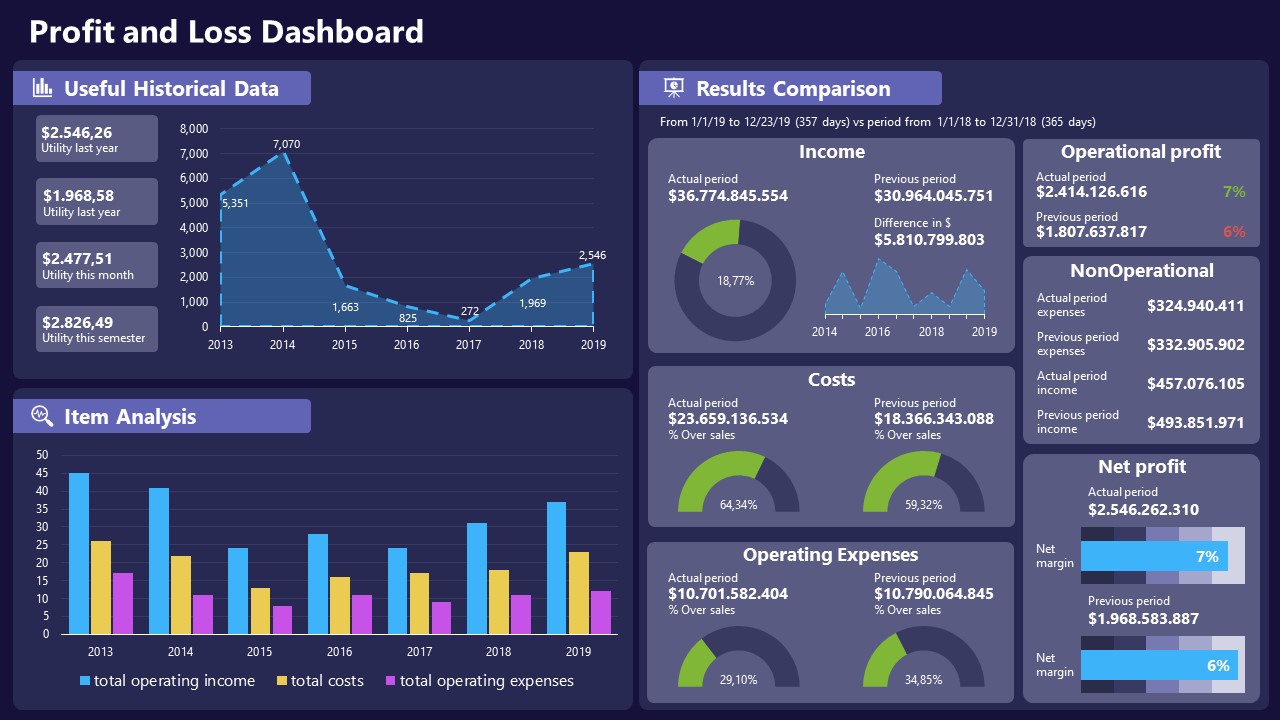
A must-have for finance professionals. This typical profit & loss dashboard includes progress bars, donut charts, column charts, line graphs, and everything that’s required to deliver a comprehensive report about a company’s financial situation.
Overwhelming visuals
One of the mistakes related to using data-presenting methods is including too much data or using overly complex visualizations. They can confuse the audience and dilute the key message.
Inappropriate chart types
Choosing the wrong type of chart for the data at hand can lead to misinterpretation. For example, using a pie chart for data that doesn’t represent parts of a whole is not right.
Lack of context
Failing to provide context or sufficient labeling can make it challenging for the audience to understand the significance of the presented data.
Inconsistency in design
Using inconsistent design elements and color schemes across different visualizations can create confusion and visual disarray.
Failure to provide details
Simply presenting raw data without offering clear insights or takeaways can leave the audience without a meaningful conclusion.
Lack of focus
Not having a clear focus on the key message or main takeaway can result in a presentation that lacks a central theme.
Visual accessibility issues
Overlooking the visual accessibility of charts and graphs can exclude certain audience members who may have difficulty interpreting visual information.
In order to avoid these mistakes in data presentation, presenters can benefit from using presentation templates . These templates provide a structured framework. They ensure consistency, clarity, and an aesthetically pleasing design, enhancing data communication’s overall impact.
Understanding and choosing data presentation types are pivotal in effective communication. Each method serves a unique purpose, so selecting the appropriate one depends on the nature of the data and the message to be conveyed. The diverse array of presentation types offers versatility in visually representing information, from bar charts showing values to pie charts illustrating proportions.
Using the proper method enhances clarity, engages the audience, and ensures that data sets are not just presented but comprehensively understood. By appreciating the strengths and limitations of different presentation types, communicators can tailor their approach to convey information accurately, developing a deeper connection between data and audience understanding.
If you need a quick method to create a data presentation, check out our AI presentation maker . A tool in which you add the topic, curate the outline, select a design, and let AI do the work for you.
[1] Government of Canada, S.C. (2021) 5 Data Visualization 5.2 Bar Chart , 5.2 Bar chart . https://www150.statcan.gc.ca/n1/edu/power-pouvoir/ch9/bargraph-diagrammeabarres/5214818-eng.htm
[2] Kosslyn, S.M., 1989. Understanding charts and graphs. Applied cognitive psychology, 3(3), pp.185-225. https://apps.dtic.mil/sti/pdfs/ADA183409.pdf
[3] Creating a Dashboard . https://it.tufts.edu/book/export/html/1870
[4] https://www.goldenwestcollege.edu/research/data-and-more/data-dashboards/index.html
[5] https://www.mit.edu/course/21/21.guide/grf-line.htm
[6] Jadeja, M. and Shah, K., 2015, January. Tree-Map: A Visualization Tool for Large Data. In GSB@ SIGIR (pp. 9-13). https://ceur-ws.org/Vol-1393/gsb15proceedings.pdf#page=15
[7] Heat Maps and Quilt Plots. https://www.publichealth.columbia.edu/research/population-health-methods/heat-maps-and-quilt-plots
[8] EIU QGIS WORKSHOP. https://www.eiu.edu/qgisworkshop/heatmaps.php
[9] About Pie Charts. https://www.mit.edu/~mbarker/formula1/f1help/11-ch-c8.htm
[10] Histograms. https://sites.utexas.edu/sos/guided/descriptive/numericaldd/descriptiven2/histogram/ [11] https://asq.org/quality-resources/scatter-diagram
Like this article? Please share
Data Analysis, Data Science, Data Visualization Filed under Design
Related Articles
Filed under Design • November 21st, 2024
Line Chart Examples: A Guide to Complex Data Representation
Discover professional line chart examples, creation tips, and ideas to effectively analyze and present your data trends.
Filed under Business • October 8th, 2024
Data-Driven Decision Making: Presenting the Process Behind Informed Choices
Discover how to harness data for informed decision-making and create impactful presentations. A detailed guide + templates on DDDM presentation slides.

Filed under Google Slides Tutorials • June 3rd, 2024
How To Make a Graph on Google Slides
Creating quality graphics is an essential aspect of designing data presentations. Learn how to make a graph in Google Slides with this guide.
Leave a Reply
An official website of the United States government
Official websites use .gov A .gov website belongs to an official government organization in the United States.
Secure .gov websites use HTTPS A lock ( Lock Locked padlock icon ) or https:// means you've safely connected to the .gov website. Share sensitive information only on official, secure websites.
- Publications
- Account settings
- Advanced Search
- Journal List
Statistical data presentation
Sangseok lee.
- Author information
- Article notes
- Copyright and License information
Corresponding author: Sangseok Lee, M.D. Department of Anesthesiology and Pain Medicine, Sanggye Paik Hospital, Inje University College of Medicine, 1342, Dongil-ro, Nowon-gu, Seoul 01757, Korea. Tel: 82-2-950-1171, Fax: 82-2-950-1323, [email protected]
Corresponding author.
Received 2017 Mar 20; Accepted 2017 Apr 4; Issue date 2017 Jun.
This is an open-access article distributed under the terms of the Creative Commons Attribution Non-Commercial License ( http://creativecommons.org/licenses/by-nc/4.0/ ), which permits unrestricted non-commercial use, distribution, and reproduction in any medium, provided the original work is properly cited.
Data are usually collected in a raw format and thus the inherent information is difficult to understand. Therefore, raw data need to be summarized, processed, and analyzed. However, no matter how well manipulated, the information derived from the raw data should be presented in an effective format, otherwise, it would be a great loss for both authors and readers. In this article, the techniques of data and information presentation in textual, tabular, and graphical forms are introduced. Text is the principal method for explaining findings, outlining trends, and providing contextual information. A table is best suited for representing individual information and represents both quantitative and qualitative information. A graph is a very effective visual tool as it displays data at a glance, facilitates comparison, and can reveal trends and relationships within the data such as changes over time, frequency distribution, and correlation or relative share of a whole. Text, tables, and graphs for data and information presentation are very powerful communication tools. They can make an article easy to understand, attract and sustain the interest of readers, and efficiently present large amounts of complex information. Moreover, as journal editors and reviewers glance at these presentations before reading the whole article, their importance cannot be ignored.
Keywords: Data presentation, Data visualization, Graph, Statistics, Table
Introduction
Data are a set of facts, and provide a partial picture of reality. Whether data are being collected with a certain purpose or collected data are being utilized, questions regarding what information the data are conveying, how the data can be used, and what must be done to include more useful information must constantly be kept in mind.
Since most data are available to researchers in a raw format, they must be summarized, organized, and analyzed to usefully derive information from them. Furthermore, each data set needs to be presented in a certain way depending on what it is used for. Planning how the data will be presented is essential before appropriately processing raw data.
First, a question for which an answer is desired must be clearly defined. The more detailed the question is, the more detailed and clearer the results are. A broad question results in vague answers and results that are hard to interpret. In other words, a well-defined question is crucial for the data to be well-understood later. Once a detailed question is ready, the raw data must be prepared before processing. These days, data are often summarized, organized, and analyzed with statistical packages or graphics software. Data must be prepared in such a way they are properly recognized by the program being used. The present study does not discuss this data preparation process, which involves creating a data frame, creating/changing rows and columns, changing the level of a factor, categorical variable, coding, dummy variables, variable transformation, data transformation, missing value, outlier treatment, and noise removal.
We describe the roles and appropriate use of text, tables, and graphs (graphs, plots, or charts), all of which are commonly used in reports, articles, posters, and presentations. Furthermore, we discuss the issues that must be addressed when presenting various kinds of information, and effective methods of presenting data, which are the end products of research, and of emphasizing specific information.
Data Presentation
Data can be presented in one of the three ways:
–in tabular form; or
–in graphical form.
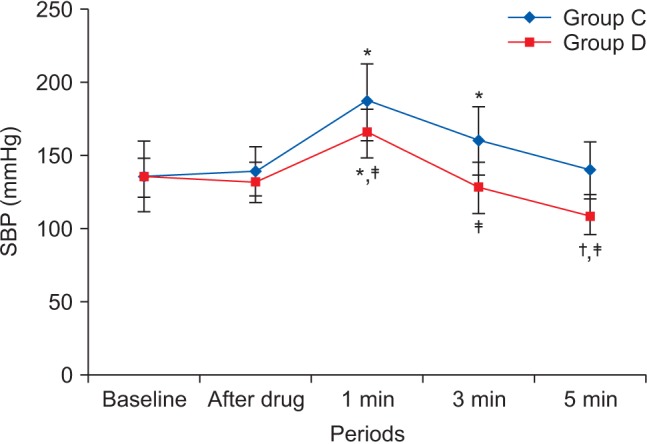
Methods of presentation must be determined according to the data format, the method of analysis to be used, and the information to be emphasized. Inappropriately presented data fail to clearly convey information to readers and reviewers. Even when the same information is being conveyed, different methods of presentation must be employed depending on what specific information is going to be emphasized. A method of presentation must be chosen after carefully weighing the advantages and disadvantages of different methods of presentation. For easy comparison of different methods of presentation, let us look at a table ( Table 1 ) and a line graph ( Fig. 1 ) that present the same information [ 1 ]. If one wishes to compare or introduce two values at a certain time point, it is appropriate to use text or the written language. However, a table is the most appropriate when all information requires equal attention, and it allows readers to selectively look at information of their own interest. Graphs allow readers to understand the overall trend in data, and intuitively understand the comparison results between two groups. One thing to always bear in mind regardless of what method is used, however, is the simplicity of presentation.
Table 1. Modified Table in Lee and Kim's Research (Adapted from Korean J Anesthesiol 2017; 70: 39-45).
Values are expressed as mean ± SD. Group C: normal saline, Group D: dexmedetomidine. SBP: systolic blood pressure, DBP: diastolic blood pressure, MBP: mean blood pressure, HR: heart rate. * P < 0.05 indicates a significant increase in each group, compared with the baseline values. † P < 0.05 indicates a significant decrease noted in Group D, compared with the baseline values. ‡ P < 0.05 indicates a significant difference between the groups.
Fig. 1. Line graph with whiskers. Changes in systolic blood pressure (SBP) in the two groups. Group C: normal saline, Group D: dexmedetomidine. *P < 0.05 indicates a significant increase in each group, compared with the baseline values. † P < 0.05 indicates a significant decrease noted in Group D, compared with the baseline values. ‡ P < 0.05 indicates a significant difference between the groups (Adapted from Korean J Anesthesiol 2017; 70: 39-45).
Text presentation
Text is the main method of conveying information as it is used to explain results and trends, and provide contextual information. Data are fundamentally presented in paragraphs or sentences. Text can be used to provide interpretation or emphasize certain data. If quantitative information to be conveyed consists of one or two numbers, it is more appropriate to use written language than tables or graphs. For instance, information about the incidence rates of delirium following anesthesia in 2016–2017 can be presented with the use of a few numbers: “The incidence rate of delirium following anesthesia was 11% in 2016 and 15% in 2017; no significant difference of incidence rates was found between the two years.” If this information were to be presented in a graph or a table, it would occupy an unnecessarily large space on the page, without enhancing the readers' understanding of the data. If more data are to be presented, or other information such as that regarding data trends are to be conveyed, a table or a graph would be more appropriate. By nature, data take longer to read when presented as texts and when the main text includes a long list of information, readers and reviewers may have difficulties in understanding the information.
Table presentation
Tables, which convey information that has been converted into words or numbers in rows and columns, have been used for nearly 2,000 years. Anyone with a sufficient level of literacy can easily understand the information presented in a table. Tables are the most appropriate for presenting individual information, and can present both quantitative and qualitative information. Examples of qualitative information are the level of sedation [ 2 ], statistical methods/functions [ 3 , 4 ], and intubation conditions [ 5 ].
The strength of tables is that they can accurately present information that cannot be presented with a graph. A number such as “132.145852” can be accurately expressed in a table. Another strength is that information with different units can be presented together. For instance, blood pressure, heart rate, number of drugs administered, and anesthesia time can be presented together in one table. Finally, tables are useful for summarizing and comparing quantitative information of different variables. However, the interpretation of information takes longer in tables than in graphs, and tables are not appropriate for studying data trends. Furthermore, since all data are of equal importance in a table, it is not easy to identify and selectively choose the information required.
For a general guideline for creating tables, refer to the journal submission requirements 1) .
Heat maps for better visualization of information than tables
Heat maps help to further visualize the information presented in a table by applying colors to the background of cells. By adjusting the colors or color saturation, information is conveyed in a more visible manner, and readers can quickly identify the information of interest ( Table 2 ). Software such as Excel (in Microsoft Office, Microsoft, WA, USA) have features that enable easy creation of heat maps through the options available on the “conditional formatting” menu.
Table 2. Difference between a Regular Table and a Heat Map.
All numbers were created by the author. SBP: systolic blood pressure, DBP: diastolic blood pressure, MBP: mean blood pressure, HR: heart rate.
Graph presentation
Whereas tables can be used for presenting all the information, graphs simplify complex information by using images and emphasizing data patterns or trends, and are useful for summarizing, explaining, or exploring quantitative data. While graphs are effective for presenting large amounts of data, they can be used in place of tables to present small sets of data. A graph format that best presents information must be chosen so that readers and reviewers can easily understand the information. In the following, we describe frequently used graph formats and the types of data that are appropriately presented with each format with examples.
Scatter plot
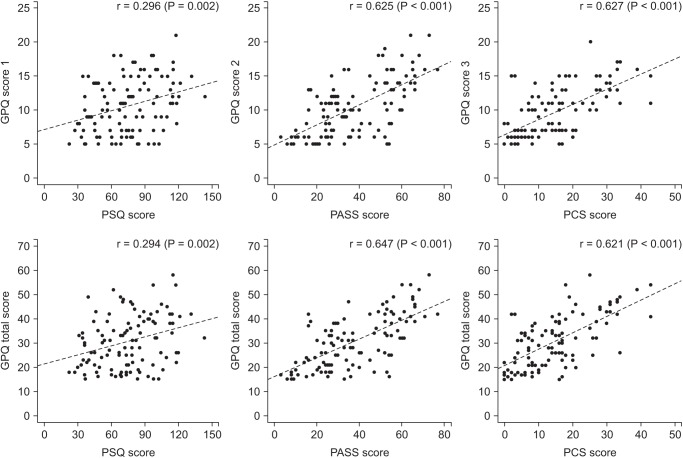
Scatter plots present data on the x - and y -axes and are used to investigate an association between two variables. A point represents each individual or object, and an association between two variables can be studied by analyzing patterns across multiple points. A regression line is added to a graph to determine whether the association between two variables can be explained or not. Fig. 2 illustrates correlations between pain scoring systems that are currently used (PSQ, Pain Sensitivity Questionnaire; PASS, Pain Anxiety Symptoms Scale; PCS, Pain Catastrophizing Scale) and Geop-Pain Questionnaire (GPQ) with the correlation coefficient, R, and regression line indicated on the scatter plot [ 6 ]. If multiple points exist at an identical location as in this example ( Fig. 2 ), the correlation level may not be clear. In this case, a correlation coefficient or regression line can be added to further elucidate the correlation.
Fig. 2. Scatter plot of GPQ scores and the other questionnaires. Score 1: sensitivity, 2: experience, 3: other. GPQ: Geop-Pain Questionnaire, PSQ: Pain Sensitivity Questionnaire, PASS: Pain Anxiety Symptoms Scale, PCS: Pain Catastrophizing Scale (Adapted from Korean J Anesthesiol 2016; 69: 492-505).
Bar graph and histogram
A bar graph is used to indicate and compare values in a discrete category or group, and the frequency or other measurement parameters (i.e. mean). Depending on the number of categories, and the size or complexity of each category, bars may be created vertically or horizontally. The height (or length) of a bar represents the amount of information in a category. Bar graphs are flexible, and can be used in a grouped or subdivided bar format in cases of two or more data sets in each category. Fig. 3 is a representative example of a vertical bar graph, with the x -axis representing the length of recovery room stay and drug-treated group, and the y -axis representing the visual analog scale (VAS) score. The mean and standard deviation of the VAS scores are expressed as whiskers on the bars ( Fig. 3 ) [ 7 ].
Fig. 3. Multiple bar graph with whiskers. Pain scores in the recovery room. * P < 0.05 compared with the control group. The nefopam group showed significant lower visual analogue scale (VAS) score at 0, 5, 15, 30, 45 and 60 minutes on postanesthesia care unit compared with the control group (Adapted from Korean J Anesthesiol 2016; 69: 480-6. Fig. 2).

By comparing the endpoints of bars, one can identify the largest and the smallest categories, and understand gradual differences between each category. It is advised to start the x - and y -axes from 0. Illustration of comparison results in the x - and y -axes that do not start from 0 can deceive readers' eyes and lead to overrepresentation of the results.
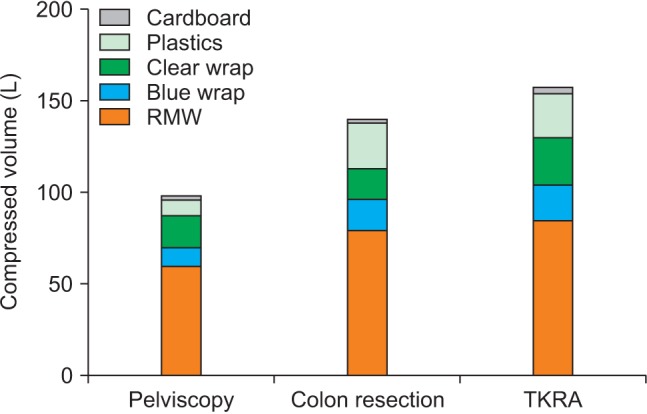
One form of vertical bar graph is the stacked vertical bar graph. A stack vertical bar graph is used to compare the sum of each category, and analyze parts of a category. While stacked vertical bar graphs are excellent from the aspect of visualization, they do not have a reference line, making comparison of parts of various categories challenging ( Fig. 4 ) [ 8 ].
Fig. 4. Stacked bar graph. Compressed volume of each component from the three operations. We checked the compressed volume of each component from the three operations; pelviscopy (with radical vaginal hysterectomy), laparoscopic anterior resection of the colon, and TKRA. TKRA: total knee replacement arthroplasty, RMW: regulated medical waste (Adapted from Korean J Anesthesiol 2017; 70: 100-4).
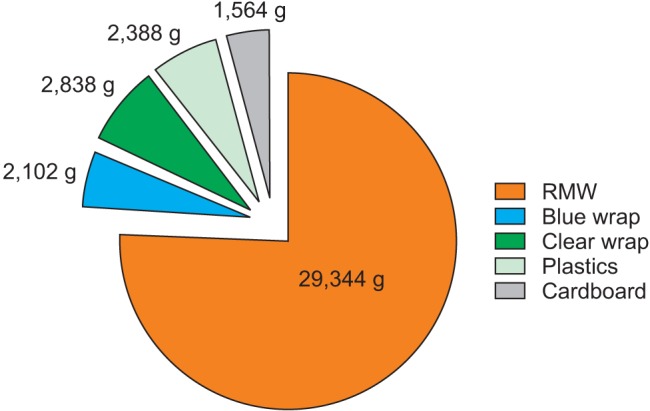
A pie chart, which is used to represent nominal data (in other words, data classified in different categories), visually represents a distribution of categories. It is generally the most appropriate format for representing information grouped into a small number of categories. It is also used for data that have no other way of being represented aside from a table (i.e. frequency table). Fig. 5 illustrates the distribution of regular waste from operation rooms by their weight [ 8 ]. A pie chart is also commonly used to illustrate the number of votes each candidate won in an election.
Fig. 5. Pie chart. Total weight of each component from the three operations. RMW: regulated medical waste (Adapted from Korean J Anesthesiol 2017; 70: 100-4).
Line plot with whiskers
A line plot is useful for representing time-series data such as monthly precipitation and yearly unemployment rates; in other words, it is used to study variables that are observed over time. Line graphs are especially useful for studying patterns and trends across data that include climatic influence, large changes or turning points, and are also appropriate for representing not only time-series data, but also data measured over the progression of a continuous variable such as distance. As can be seen in Fig. 1 , mean and standard deviation of systolic blood pressure are indicated for each time point, which enables readers to easily understand changes of systolic pressure over time [ 1 ]. If data are collected at a regular interval, values in between the measurements can be estimated. In a line graph, the x-axis represents the continuous variable, while the y-axis represents the scale and measurement values. It is also useful to represent multiple data sets on a single line graph to compare and analyze patterns across different data sets.
Box and whisker chart
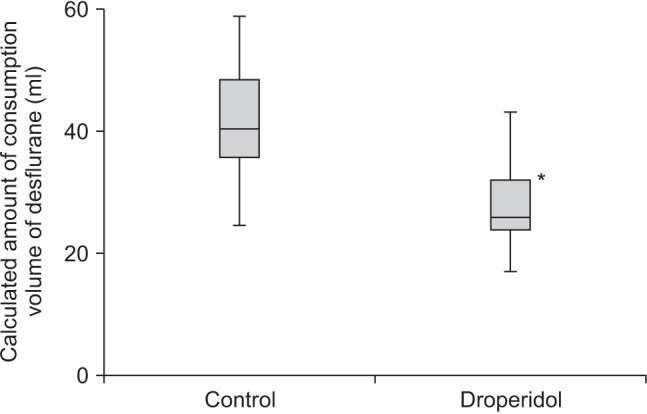
A box and whisker chart does not make any assumptions about the underlying statistical distribution, and represents variations in samples of a population; therefore, it is appropriate for representing nonparametric data. AA box and whisker chart consists of boxes that represent interquartile range (one to three), the median and the mean of the data, and whiskers presented as lines outside of the boxes. Whiskers can be used to present the largest and smallest values in a set of data or only a part of the data (i.e. 95% of all the data). Data that are excluded from the data set are presented as individual points and are called outliers. The spacing at both ends of the box indicates dispersion in the data. The relative location of the median demonstrated within the box indicates skewness ( Fig. 6 ). The box and whisker chart provided as an example represents calculated volumes of an anesthetic, desflurane, consumed over the course of the observation period ( Fig. 7 ) [ 9 ].
Fig. 6. Box graph with whiskers. This graph is a standardized way of displaying the distribution of data based on the five-number summary; minimum, first quartile, median, third quartile, and maximum. The central rectangle represents from the first quartile to the third quartile (the interquartile range [IQR]). A segment inside the rectangle shows the median and “whiskers” above and below the box show the locations of the minimum and maximum.
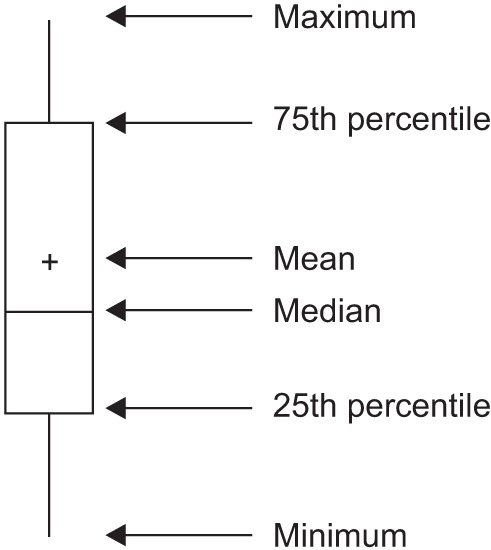
Fig. 7. Box graph with whiskers. Calculated volume of desflurane consumed during the observation period. The groups differed significantly. Data are expressed as median, minimum, first interquartile, third interquartile, and maximum values. * P < 0.05 (Adapted from Korean J Anesthesiol 2017; 70: 27-32).
Three-dimensional effects
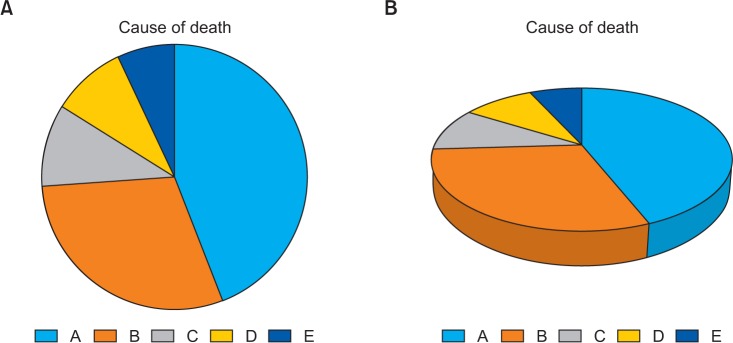
Most of the recently introduced statistical packages and graphics software have the three-dimensional (3D) effect feature. The 3D effects can add depth and perspective to a graph. However, since they may make reading and interpreting data more difficult, they must only be used after careful consideration. The application of 3D effects on a pie chart makes distinguishing the size of each slice difficult. Even if slices are of similar sizes, slices farther from the front of the pie chart may appear smaller than the slices closer to the front ( Fig. 8 ).
Fig. 8. Simple pie chart (A) versus 3D pie chart (B). In the 3D pie chart, slices at the rear of the chart appear smaller than those at the front because of the false perspective.
Drawing a graph: example
Finally, we explain how to create a graph by using a line graph as an example ( Fig. 9 ). In Fig. 9 , the mean values of arterial pressure were randomly produced and assumed to have been measured on an hourly basis. In many graphs, the x- and y-axes meet at the zero point ( Fig. 9A ). In this case, information regarding the mean and standard deviation of mean arterial pressure measurements corresponding to t = 0 cannot be conveyed as the values overlap with the y-axis. The data can be clearly exposed by separating the zero point ( Fig. 9B ). In Fig. 9B , the mean and standard deviation of different groups overlap and cannot be clearly distinguished from each other. Separating the data sets and presenting standard deviations in a single direction prevents overlapping and, therefore, reduces the visual inconvenience. Doing so also reduces the excessive number of ticks on the y-axis, increasing the legibility of the graph ( Fig. 9C ). In the last graph, different shapes were used for the lines connecting different time points to further allow the data to be distinguished, and the y-axis was shortened to get rid of the unnecessary empty space present in the previous graphs ( Fig. 9D ). A graph can be made easier to interpret by assigning each group to a different color, changing the shape of a point, or including graphs of different formats [ 10 ]. The use of random settings for the scale in a graph may lead to inappropriate presentation or presentation of data that can deceive readers' eyes ( Fig. 10 ).
Fig. 9. Clarification of a graph. Virtual data are presented as mean with standard deviations. (A) A graph with default settings. (B) The axes are separated from each other. The data at 0 are displayed clearly. (C) The points and whiskers are jittered to avoid overlapping. Although one side of the whiskers are removed, it is still easy to understand. However, this graph still has unnecessary blank space. (D) The lines are expressed in various ways. A break is put in the y-axis. MBP: mean blood pressure.
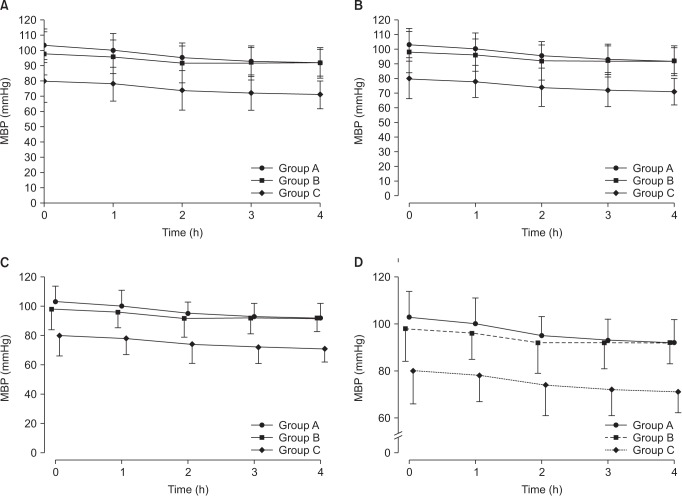
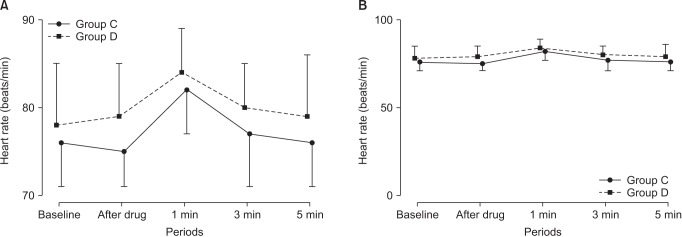
Fig. 10. An example of misleading graphs. Both plots use the same data set. (A) The readers might be thinking that the heart rates at 1 min are higher than others. (B) The heart rates are very stable during the study. The readers should check the scale of the y-axis and baseline values when they look at the graphs.
Owing to the lack of space, we could not discuss all types of graphs, but have focused on describing graphs that are frequently used in scholarly articles. We have summarized the commonly used types of graphs according to the method of data analysis in Table 3 . For general guidelines on graph designs, please refer to the journal submission requirements 2) .
Table 3. Types of Charts Depending on the Method of Analysis of the Data.
Conclusions.
Text, tables, and graphs are effective communication media that present and convey data and information. They aid readers in understanding the content of research, sustain their interest, and effectively present large quantities of complex information. As journal editors and reviewers will scan through these presentations before reading the entire text, their importance cannot be disregarded. For this reason, authors must pay as close attention to selecting appropriate methods of data presentation as when they were collecting data of good quality and analyzing them. In addition, having a well-established understanding of different methods of data presentation and their appropriate use will enable one to develop the ability to recognize and interpret inappropriately presented data or data presented in such a way that it deceives readers' eyes [ 11 ].
<Appendix>
Output for presentation.
Discovery and communication are the two objectives of data visualization. In the discovery phase, various types of graphs must be tried to understand the rough and overall information the data are conveying. The communication phase is focused on presenting the discovered information in a summarized form. During this phase, it is necessary to polish images including graphs, pictures, and videos, and consider the fact that the images may look different when printed than how appear on a computer screen. In this appendix, we discuss important concepts that one must be familiar with to print graphs appropriately.
The KJA asks that pictures and images meet the following requirement before submission 3)
“Figures and photographs should be submitted as ‘TIFF’ files. Submit files of figures and photographs separately from the text of the paper. Width of figure should be 84 mm (one column). Contrast of photos or graphs should be at least 600 dpi. Contrast of line drawings should be at least 1,200 dpi. The Powerpoint file (ppt, pptx) is also acceptable.”
Unfortunately, without sufficient knowledge of computer graphics, it is not easy to understand the submission requirement above. Therefore, it is necessary to develop an understanding of image resolution, image format (bitmap and vector images), and the corresponding file specifications.
Resolution is often mentioned to describe the quality of images containing graphs or CT/MRI scans, and video files. The higher the resolution, the clearer and closer to reality the image is, while the opposite is true for low resolutions. The most representative unit used to describe a resolution is “dpi” (dots per inch): this literally translates to the number of dots required to constitute 1 inch. The greater the number of dots, the higher the resolution. The KJA submission requirements recommend 600 dpi for images, and 1,200 dpi 4) for graphs. In other words, resolutions in which 600 or 1,200 dots constitute one inch are required for submission.
There are requirements for the horizontal length of an image in addition to the resolution requirements. While there are no requirements for the vertical length of an image, it must not exceed the vertical length of a page. The width of a column on one side of a printed page is 84 mm, or 3.3 inches (84/25.4 mm ≒ 3.3 inches). Therefore, a graph must have a resolution in which 1,200 dots constitute 1 inch, and have a width of 3.3 inches.
Bitmap and Vector
Methods of image construction are important. Bitmap images can be considered as images drawn on section paper. Enlarging the image will enlarge the picture along with the grid, resulting in a lower resolution; in other words, aliasing occurs. On the other hand, reducing the size of the image will reduce the size of the picture, while increasing the resolution. In other words, resolution and the size of an image are inversely proportionate to one another in bitmap images, and it is a drawback of bitmap images that resolution must be considered when adjusting the size of an image. To enlarge an image while maintaining the same resolution, the size and resolution of the image must be determined before saving the image. An image that has already been created cannot avoid changes to its resolution according to changes in size. Enlarging an image while maintaining the same resolution will increase the number of horizontal and vertical dots, ultimately increasing the number of pixels 5) of the image, and the file size. In other words, the file size of a bitmap image is affected by the size and resolution of the image (file extensions include JPG [JPEG] 6) , PNG 7) , GIF 8) , and TIF [TIFF] 9) . To avoid this complexity, the width of an image can be set to 4 inches and its resolution to 900 dpi to satisfy the submission requirements of most journals [ 12 ].
Vector images overcome the shortcomings of bitmap images. Vector images are created based on mathematical operations of line segments and areas between different points, and are not affected by aliasing or pixelation. Furthermore, they result in a smaller file size that is not affected by the size of the image. They are commonly used for drawings and illustrations (file extensions include EPS 10) , CGM 11) , and SVG 12) ).
Finally, the PDF 13) is a file format developed by Adobe Systems (Adobe Systems, CA, USA) for electronic documents, and can contain general documents, text, drawings, images, and fonts. They can also contain bitmap and vector images. While vector images are used by researchers when working in Powerpoint, they are saved as 960 × 720 dots when saved in TIFF format in Powerpoint. This results in a resolution that is inappropriate for printing on a paper medium. To save high-resolution bitmap images, the image must be saved as a PDF file instead of a TIFF, and the saved PDF file must be imported into an imaging processing program such as Photoshop™(Adobe Systems, CA, USA) to be saved in TIFF format [ 12 ].
1) Instructions to authors in KJA; section 5-(9) Table; https://ekja.org/index.php?body=instruction
2) Instructions to Authors in KJA; section 6-1)-(10) Figures and illustrations in Manuscript preparation; https://ekja.org/index.php?body=instruction
3) Instructions to Authors in KJA; section 6-1)-(10) Figures and illustrations in Manuscript preparation; https://ekja.org/index.php?body=instruction
4) Resolution; in KJA, it is represented by “contrast.”
5) Pixel is a minimum unit of an image and contains information of a dot and color. It is derived by multiplying the number of vertical and horizontal dots regardless of image size. For example, Full High Definition (FHD) monitor has 1920 × 1080 dots ≒ 2.07 million pixel.
6) Joint Photographic Experts Group.
7) Portable Network Graphics.
8) Graphics Interchange Format
9) Tagged Image File Format; TIFF
10) Encapsulated PostScript.
11) Computer Graphics Metafile.
12) Scalable Vector Graphics.
13) Portable Document Format.
- 1. Lee CW, Kim M. Effects of preanesthetic dexmedetomidine on hemodynamic responses to endotracheal intubation in elderly patients undergoing treatment for hypertension: a randomized, double-blinded trial. Korean J Anesthesiol. 2017;70:39–45. doi: 10.4097/kjae.2017.70.1.39. [ DOI ] [ PMC free article ] [ PubMed ] [ Google Scholar ]
- 2. Sohn HM, Ryu JH. Monitored anesthesia care in and outside the operating room. Korean J Anesthesiol. 2016;69:319–326. doi: 10.4097/kjae.2016.69.4.319. [ DOI ] [ PMC free article ] [ PubMed ] [ Google Scholar ]
- 3. Nahm FS. Nonparametric statistical tests for the continuous data: the basic concept and the practical use. Korean J Anesthesiol. 2016;69:8–14. doi: 10.4097/kjae.2016.69.1.8. [ DOI ] [ PMC free article ] [ PubMed ] [ Google Scholar ]
- 4. Kim TK. Understanding one-way ANOVA using conceptual figures. Korean J Anesthesiol. 2017;70:22–26. doi: 10.4097/kjae.2017.70.1.22. [ DOI ] [ PMC free article ] [ PubMed ] [ Google Scholar ]
- 5. Jung W, Hwang M, Won YJ, Lim BG, Kong MH, Lee IO. Comparison of clinical validation of acceleromyography and electromyography in children who were administered rocuronium during general anesthesia: a prospective double-blinded randomized study. Korean J Anesthesiol. 2016;69:21–26. doi: 10.4097/kjae.2016.69.1.21. [ DOI ] [ PMC free article ] [ PubMed ] [ Google Scholar ]
- 6. Cho SH, Ko SH, Lee MS, Koo BS, Lee JH, Kim SH, et al. Development of the Geop-Pain questionnaire for multidisciplinary assessment of pain sensitivity. Korean J Anesthesiol. 2016;69:492–505. doi: 10.4097/kjae.2016.69.5.492. [ DOI ] [ PMC free article ] [ PubMed ] [ Google Scholar ]
- 7. Choi SK, Yoon MH, Choi JI, Kim WM, Heo BH, Park KS, et al. Comparison of effects of intraoperative nefopam and ketamine infusion on managing postoperative pain after laparoscopic cholecystectomy administered remifentanil. Korean J Anesthesiol. 2016;69:480–486. doi: 10.4097/kjae.2016.69.5.480. [ DOI ] [ PMC free article ] [ PubMed ] [ Google Scholar ]
- 8. Shinn HK, Hwang Y, Kim BG, Yang C, Na W, Song JH, et al. Segregation for reduction of regulated medical waste in the operating room: a case report. Korean J Anesthesiol. 2017;70:100–104. doi: 10.4097/kjae.2017.70.1.100. [ DOI ] [ PMC free article ] [ PubMed ] [ Google Scholar ]
- 9. Satomoto M, Adachi YU, Makita K. A low dose of droperidol decreases the desflurane concentration needed during breast cancer surgery: a randomized double-blinded study. Korean J Anesthesiol. 2017;70:27–32. doi: 10.4097/kjae.2017.70.1.27. [ DOI ] [ PMC free article ] [ PubMed ] [ Google Scholar ]
- 10. Few S. Show Me the Numbers. 2nd ed. Burlingame: Analytics Press; 2012. [ Google Scholar ]
- 11. Huff D. How to Lie with Statistics. London: Penguin Books; 1991. pp. 1–124. [ Google Scholar ]
- 12. Lee JH. Handling digital images for publication. Sci Ed. 2014;1:58–61. [ Google Scholar ]
- View on publisher site
- PDF (363.8 KB)
- Collections
Similar articles
Cited by other articles, links to ncbi databases.
- Download .nbib .nbib
- Format: AMA APA MLA NLM
Add to Collections

IMAGES
VIDEO
COMMENTS
Graphics reveal data features that statistics and models may miss: unusual distributions of data, local patterns, clusterings, gaps, missing values, evidence of rounding or heaping, implicit boundaries, outliers, and so on. ... Presentation and exploratory graphics are quite different animals. In presenting your results, you may have space for ...
Data Analysis and Data Presentation have a practical implementation in every possible field. It can range from academic studies, commercial, industrial and marketing activities to professional practices. In its raw form, data can be extremely complicated to decipher and in order to extract meaningful insights from the data, data analysis is an important step towards breaking down data into ...
It's like turning numbers and statistics into a captivating story that your audience can quickly grasp. When done right, data presentation can be a game-changer, enabling you to convey complex information effectively. ... Importance: Data presentations enhance clarity, engage the audience, aid decision-making, and leave a lasting impact. Types ...
Textual presentation of data includes descriptive statistics. Descriptive statistics summarizes the data using numerical measures like mean, median, mode, range, and standard deviation. Selection of the Right Method for the Presentation of Data. For the presentation of data in statistics, one should be careful in selecting the right method of ...
Summary. While a good presentation has data, data alone doesn't guarantee a good presentation. It's all about how that data is presented. The quickest way to confuse your audience is by ...
Imagine the statistical data without a definite presentation, will be burdensome! Data presentation is one of the important aspects of Statistics. Presenting the data helps the users to study and explain the statistics thoroughly. We are going to discuss this presentation of data and know-how information is laid down methodically.
Data presentation: It includes being familiar with data presentation methods and tools; being able to plan and implement how the data will be presented in a form that is understandable; being able ...
Data presentations require us to cull data in a format that allows the presenter to highlight trends, patterns, and insights so that the audience can act upon the shared information. ... It is evident that personnel are a significant investment, emphasizing their importance in the overall project budget. ... Statistics Waffle Charts PPT ...
Moreover, as journal editors and reviewers glance at these presentations before reading the whole article, their importance cannot be ignored. Keywords: Data presentation, Data visualization, Graph, Statistics, Table. Introduction. Data are a set of facts, and provide a partial picture of reality.
The Importance of Using Data Visualisation in Presentations. Data visualisation is crucial in presentations because it allows the audience to understand complex information quickly and efficiently. Using visual aids enhances the understanding of data, especially when dealing with large amounts of data or complicated concepts. Here are some ...